Sidebar
Table of Contents
VPN
Forticlient is the BSC VPN client. This client works in Windows, Ubuntu, OpenSUSE, MacOS, iOS and Android.
The following steps assume that you have root access to the machine you are configuring the VPN access.
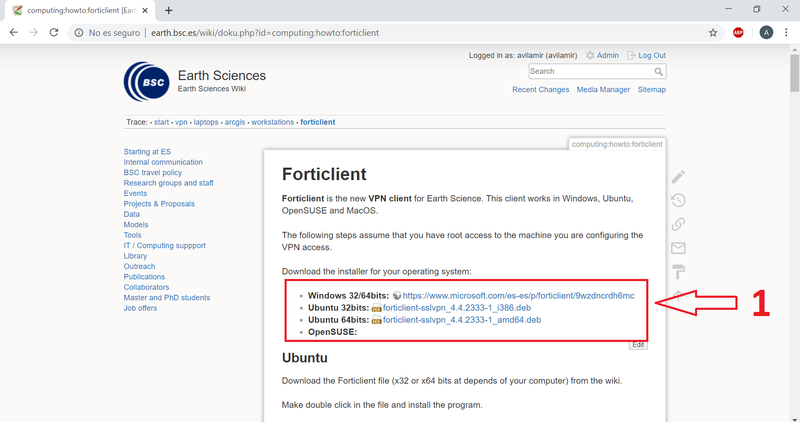
Download the installer for your operating system:
- Windows 10 32/64bits (Method 1): Microsoft Store
- Windows 10 32/64bits (Method 2): Forticlient Web
- Previous versions of Windows 10 32/64bits (Windows 7 and 8): Forticlient Web
- Ubuntu 32bits: forticlient-sslvpn_4.4.2333-1_i386.deb
- Ubuntu 64bits: forticlient-sslvpn_4.4.2333-1_amd64.deb
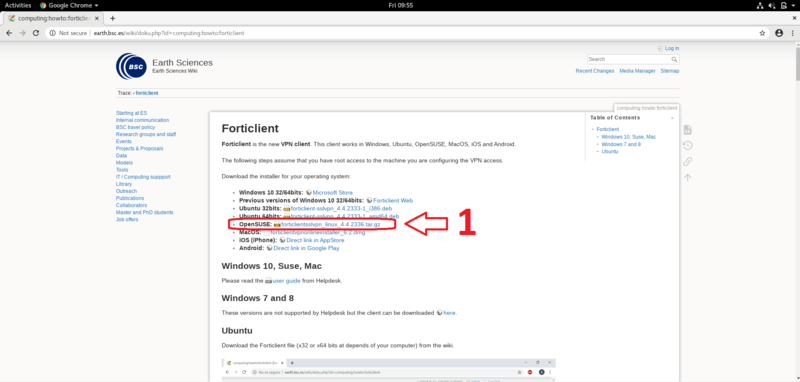
- OpenSUSE: forticlientsslvpn_linux_4.4.2336.tar.gz
- MacOS: Forticlient Web
- MacOS (Old versions): forticlient_5.6.1.723.dmg
- iOS (iPhone): Direct link in AppStore
- Android: Direct link in Google Play
Video Tutorials
- Previous versions of Windows 10 32/64bits (Windows 7 and 8): https://youtu.be/cgze9qOKF6Q
Windows 10
Method 1
This option consist in use Forticlient from Microsoft Store. So, to put the VPN using this method, follow the next steps:
In the windows search bar, search “Microsoft Store” and open it.
Click in “Search”.
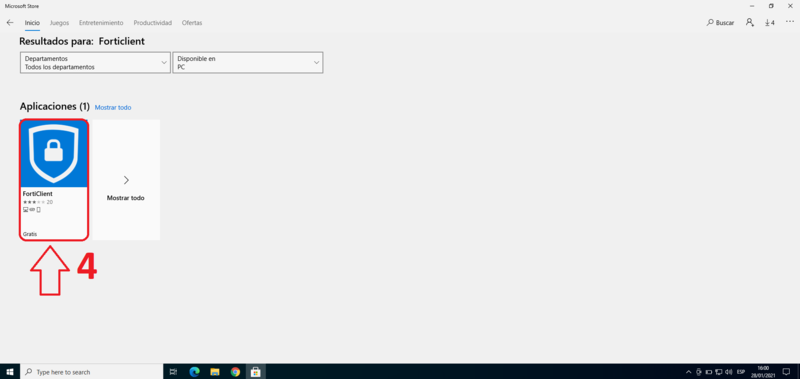
Now, search “Forticlient”.
Click in “FortiClient” application.
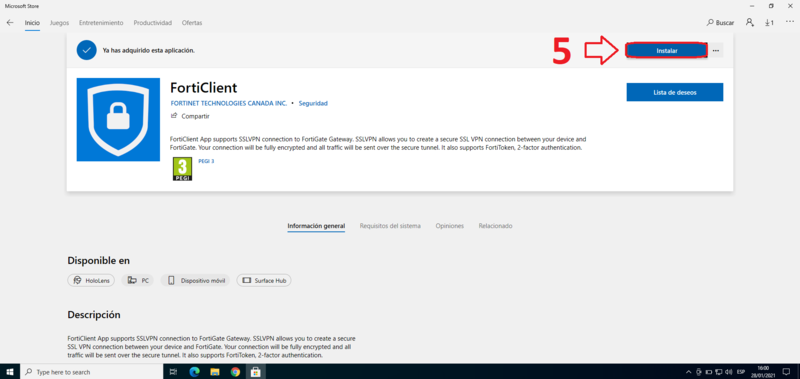
Now, click in “Install”.
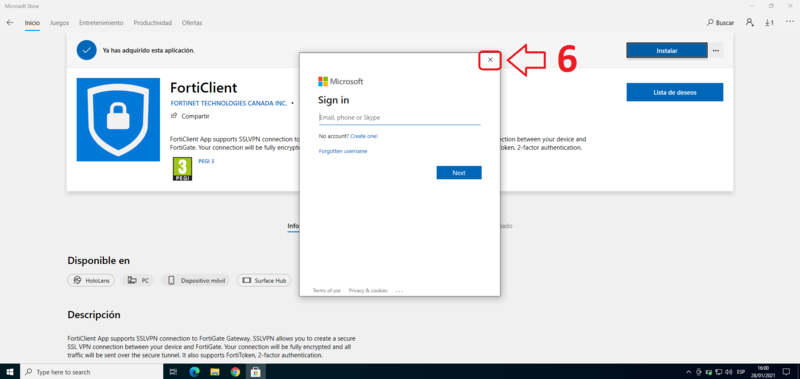
If you don’t want make a “Sign in” to download the VPN, click in the “X” of the little window and the download will start without make a “Sign in”.
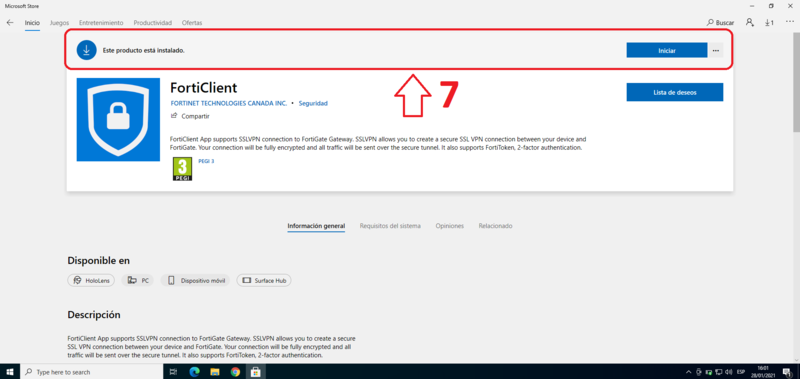
Now, we have the VPN installed.
Go in the windows search bar, search “VPN” and click in “VPN settings”.
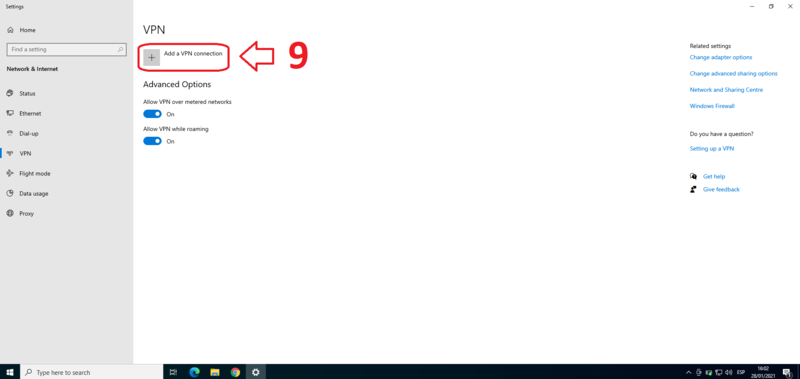
Click in “Add a VPN connection”.
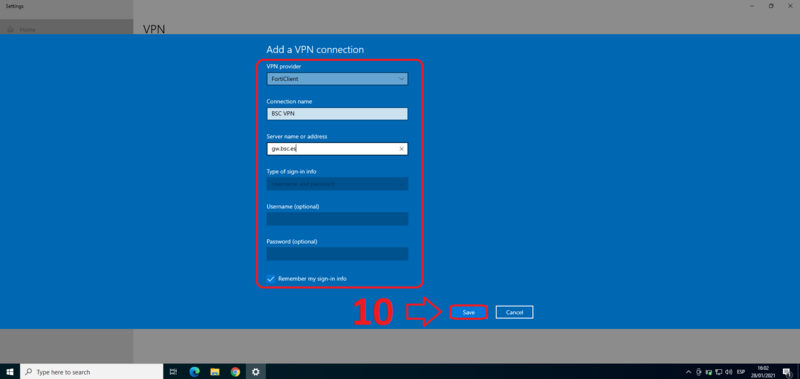
Here, put the following configuration and click in “Save”:
- VPN provider: FortiClient
- Connection name: BSC VPN
- Server name or address: gw.bsc.es
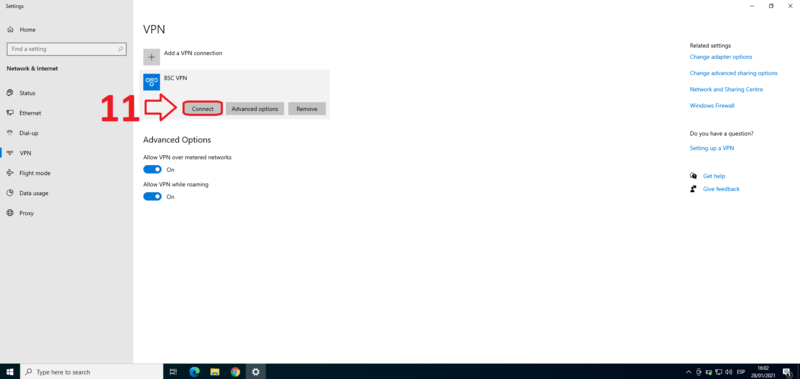
Now, click in “Connect” to establish the connection.
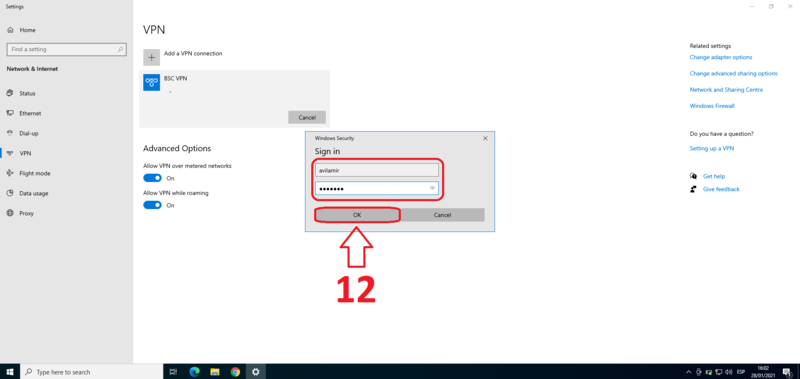
Here, put your BSC user and password and click in “Ok” to establish the connection.
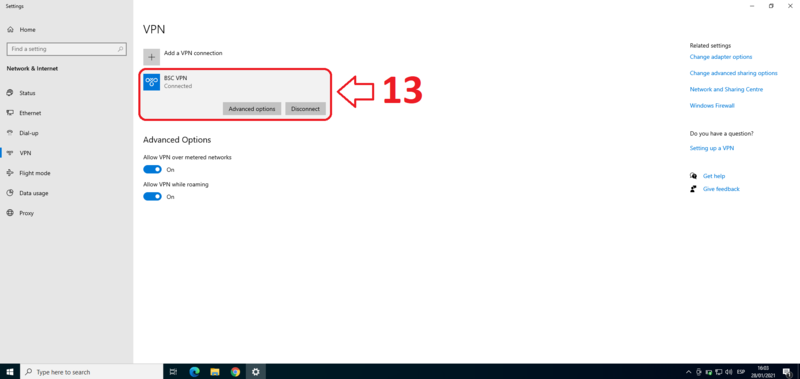
Now, you are connected in the BSC VPN.
Method 2 (Recommended)
This option consist in use Forticlient from the official web. So, to put the VPN using this method, follow the next steps:
Go in the Forticlient website and click in “FortiClient VPN only”.
In “Download VPN for Windows” click in “Download” and open the Forticlient installer.
Click in “Yes”.
Wait for the download.
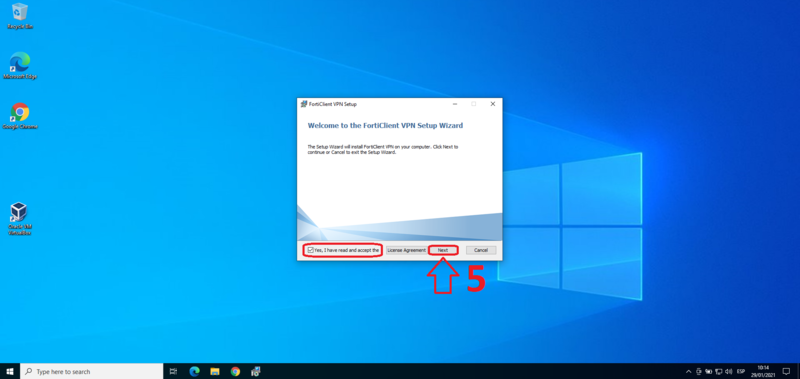
Mark the box option and click “Next”.
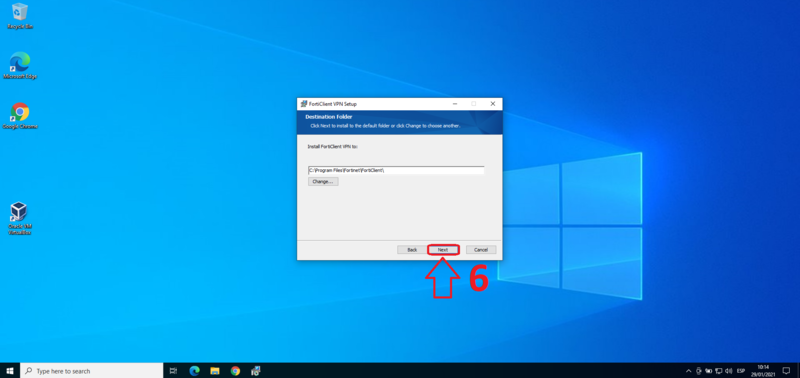
Click in “Next”
Click in “Install”.
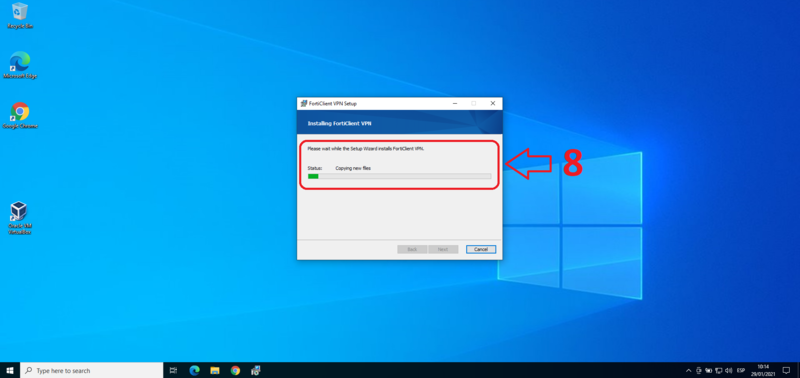
Wait for the installation to finish. This process can take between 1-30 minutes.
When the installation finish, click in “Finish”.
Open FortiClient VPN.
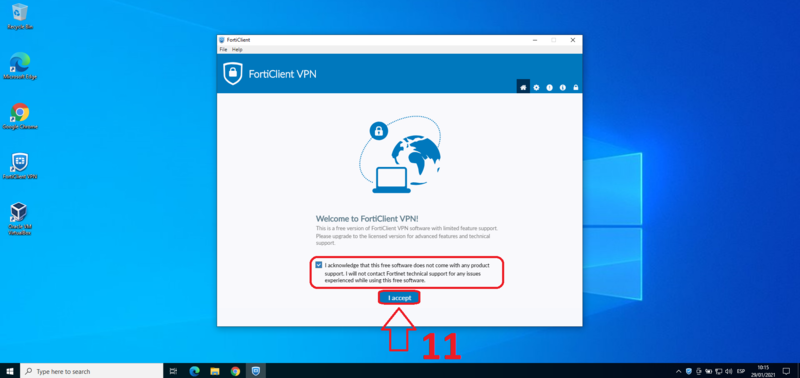
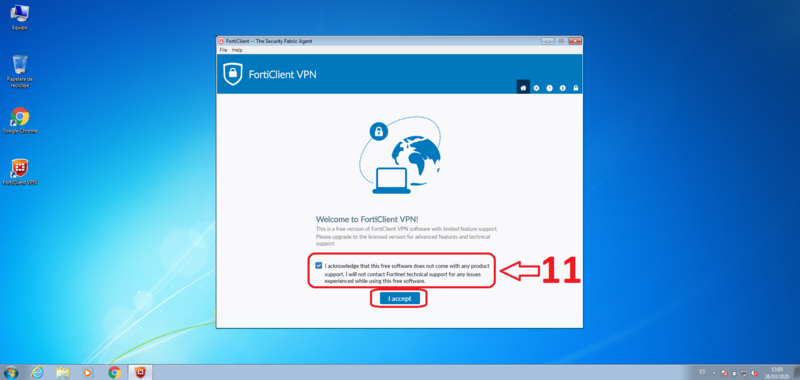
Mark the box option and click in “I accept”.
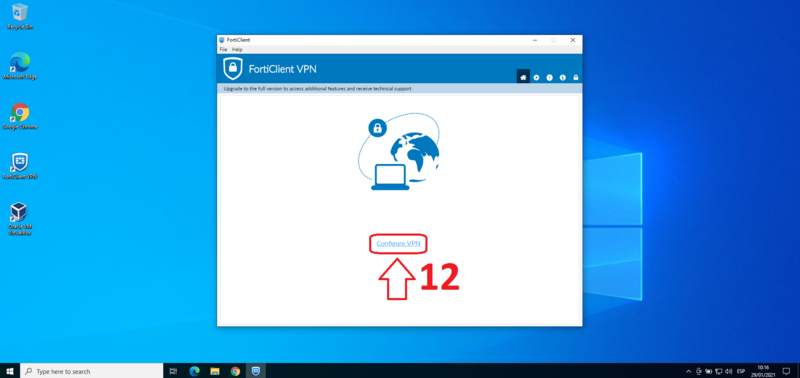
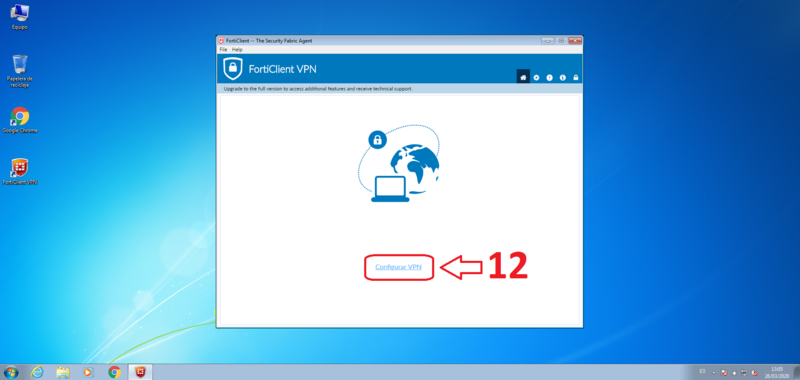
Now, click in “Configure VPN”.
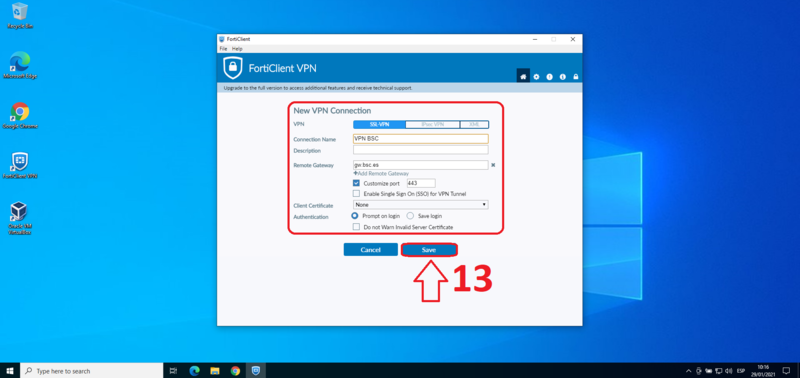
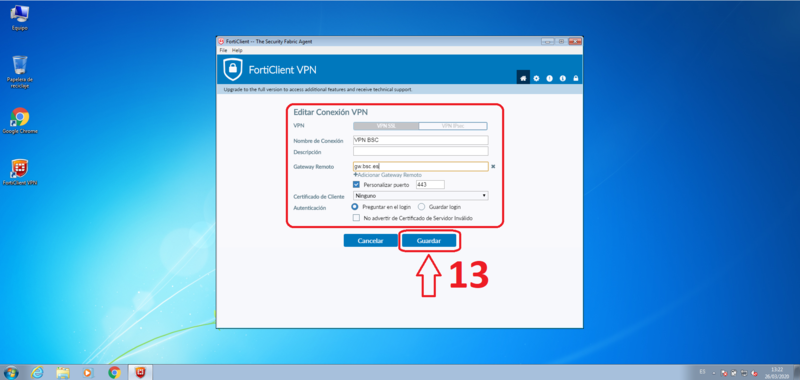
Now, put the following configuration and click in “Save”:
- Connection Name: VPN BSC
- Remote Gateway: gw.bsc.es
- Port: 443
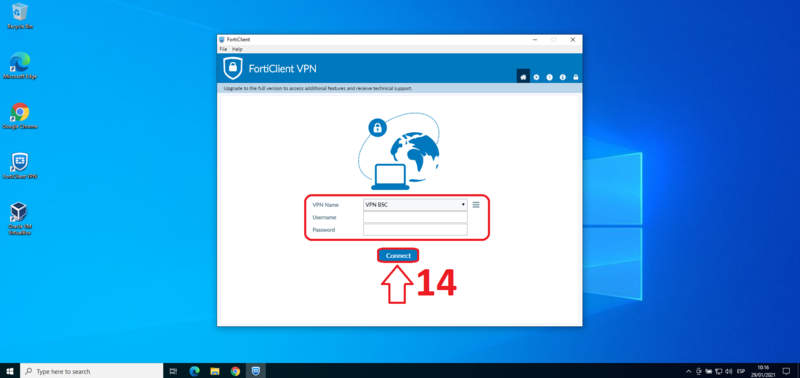
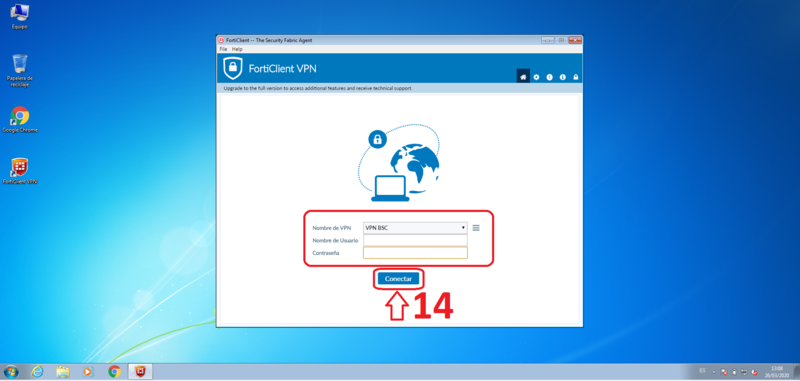
Here, put your BSC user and password and click in “Connect” to establish the connection.
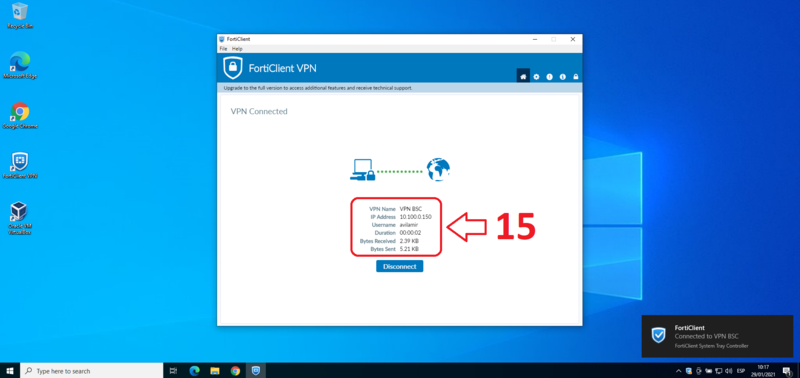
Now, you are connected in the BSC VPN.
Windows 7 and 8
Go in the Forticlient website and click in “FortiClient VPN only”.
In “Download VPN for Windows” click in “Download” and open the Forticlient installer.
Click in “Execute”.
Click in “Yes”.
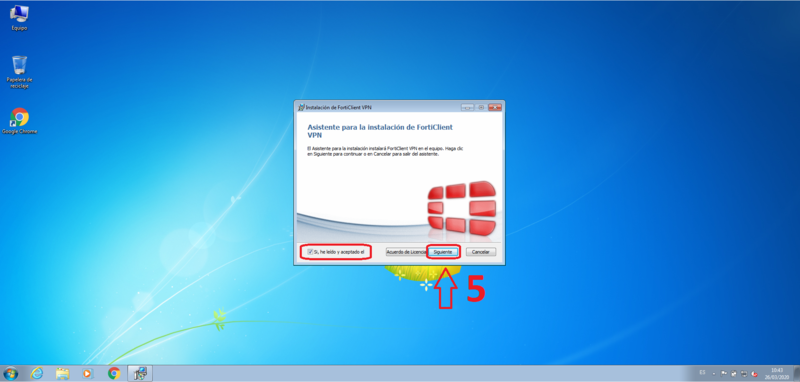
Mark the box option and click “Next”.
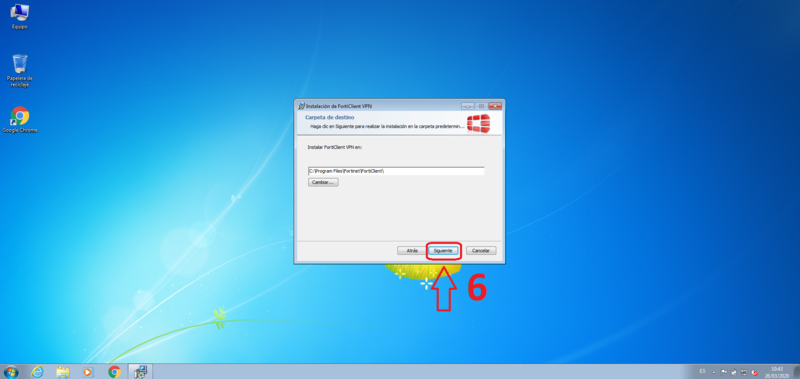
Click in “Next”.
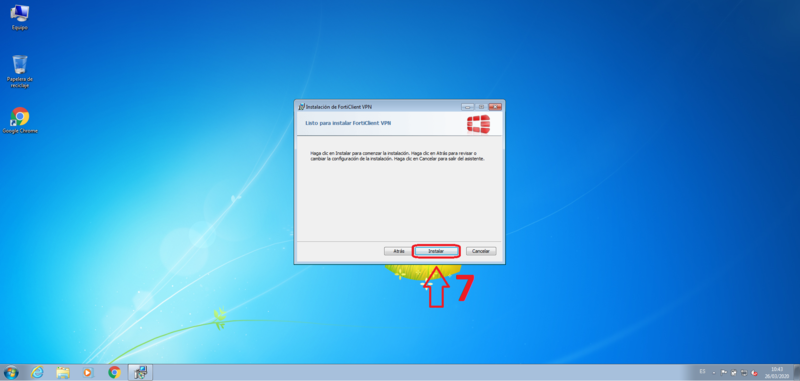
Click in “Install”.
Wait for the installation to finish. This process can take between 1-30 minutes.
When the installation finish, click in “Finish”.
Open FortiClient VPN.
Mark the box option and click in “I accept”.
Now, click in “Configure VPN”.
Now, put the following configuration and click in “Save”:
- Name: BSC VPN
- Remote gateway: gw.bsc.es
- Port: 443
Here, put your BSC user and password and click in “Connect” to establish the connection.
Now, you are connected in the BSC VPN.
MacOS
Go in the Forticlient website and click in “FortiClient VPN only”. If you have a old version of MacOS, download the file from the wiki.
In “Download VPN for MacOS” click in “Download” and open the Forticlient installer.
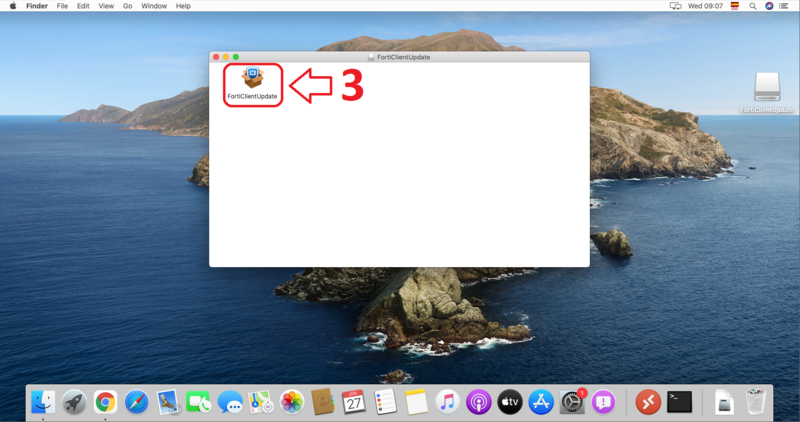
Make double click in “FortiClientUpdate”.
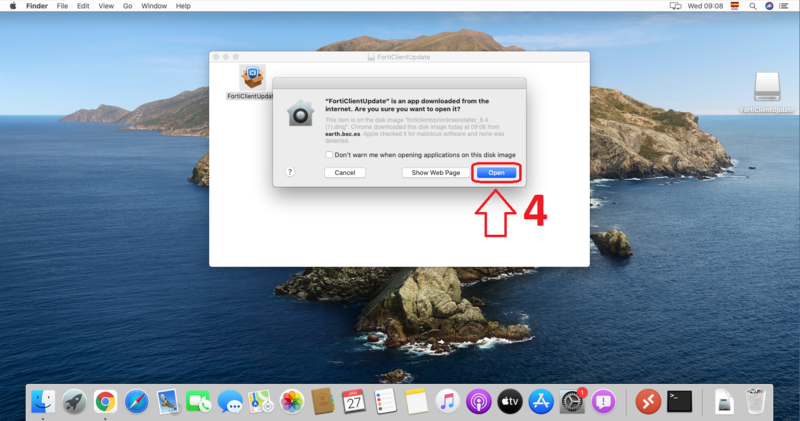
Click in “Open”.
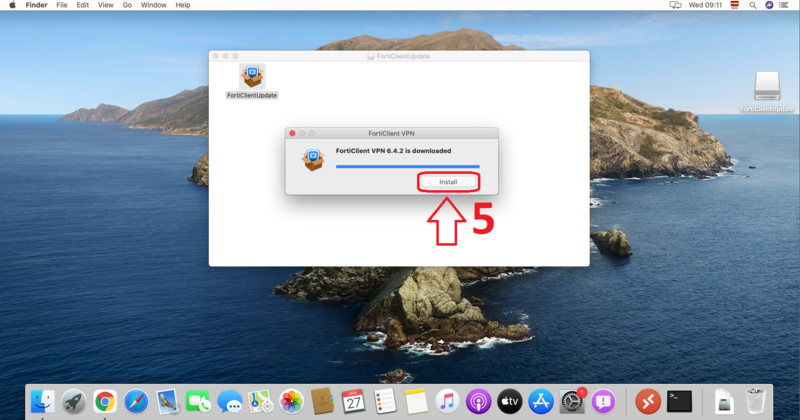
Now, click in “Install”.
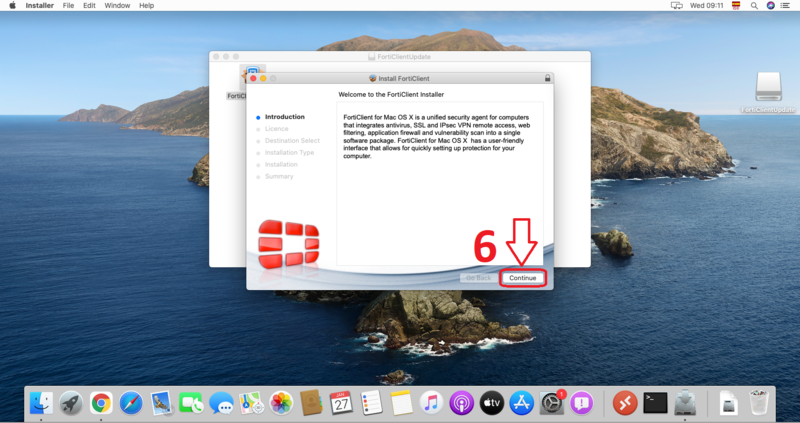
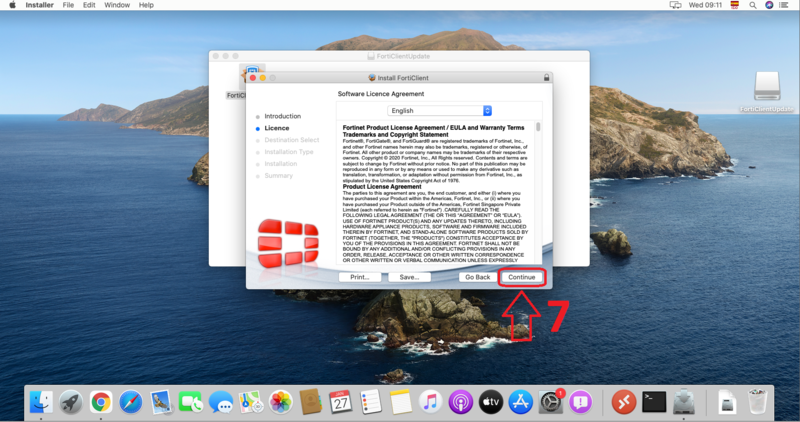
Click in “Continue”.
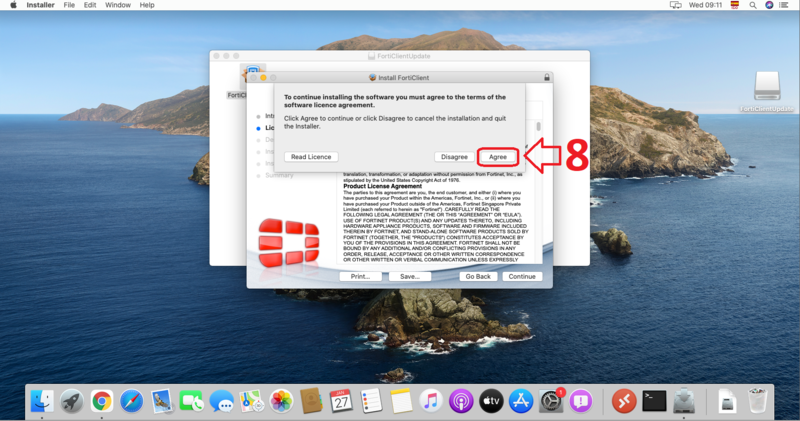
Click in “Continue”.
Click in “Agree”.
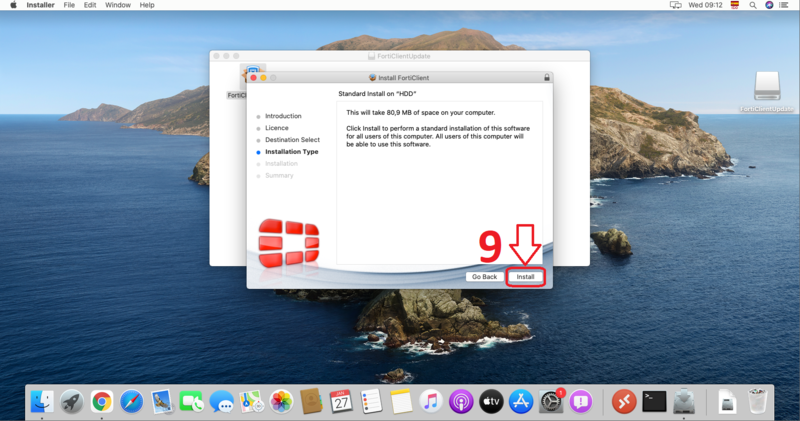
Now, click in “Install”.
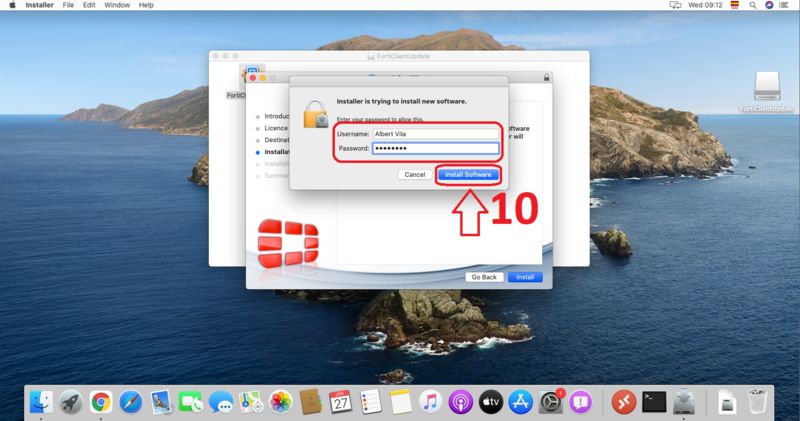
Here, put your PC password and click in “Install Software”.
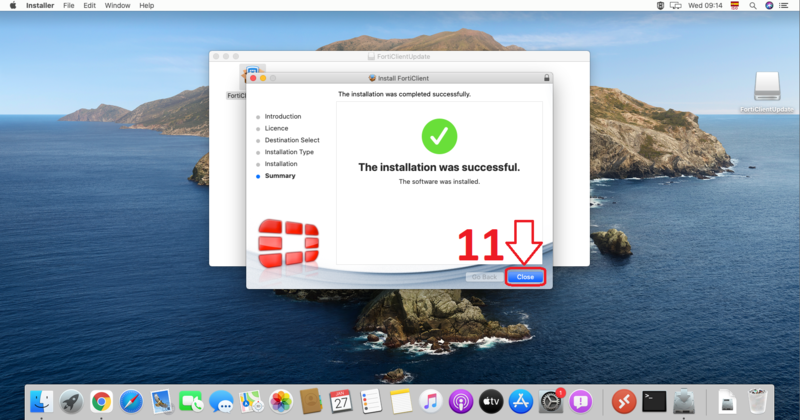
Click in “Close”.
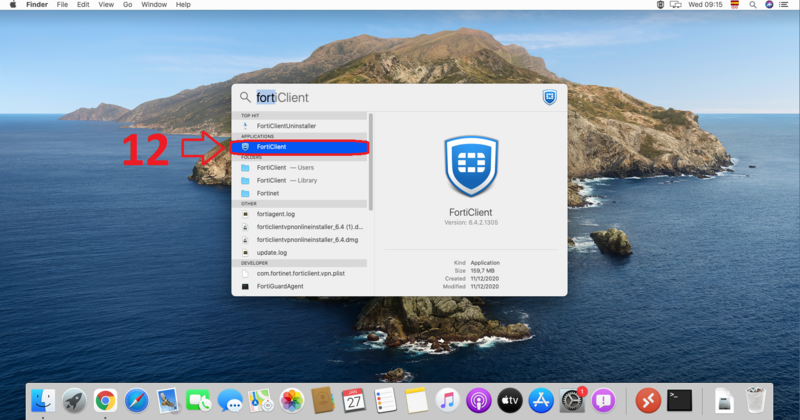
When the installation finish, open Forticlient.
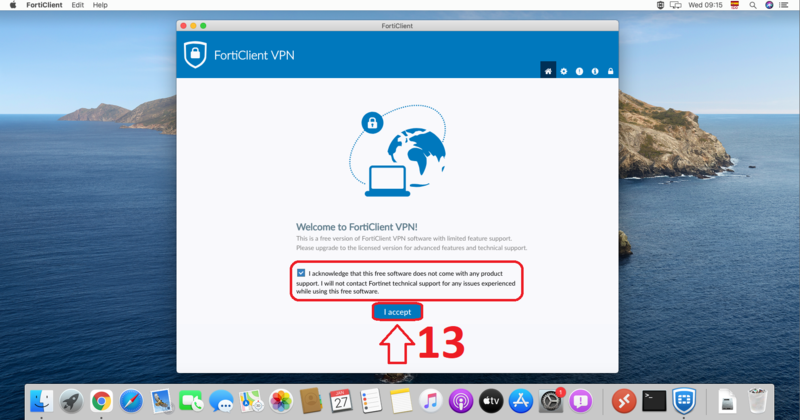
Mark the box option and click in “I accept”.
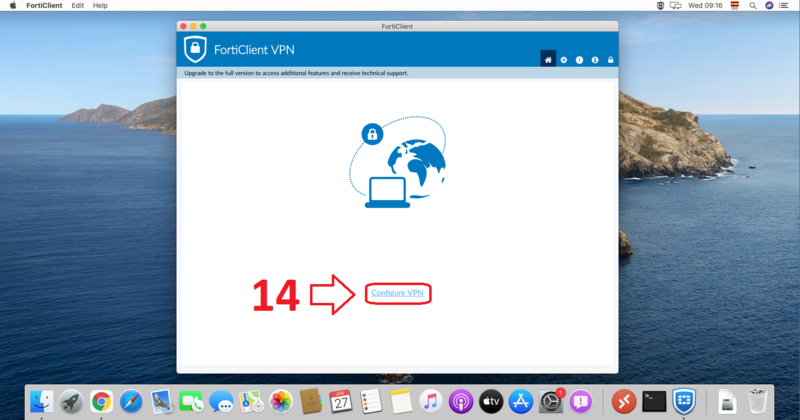
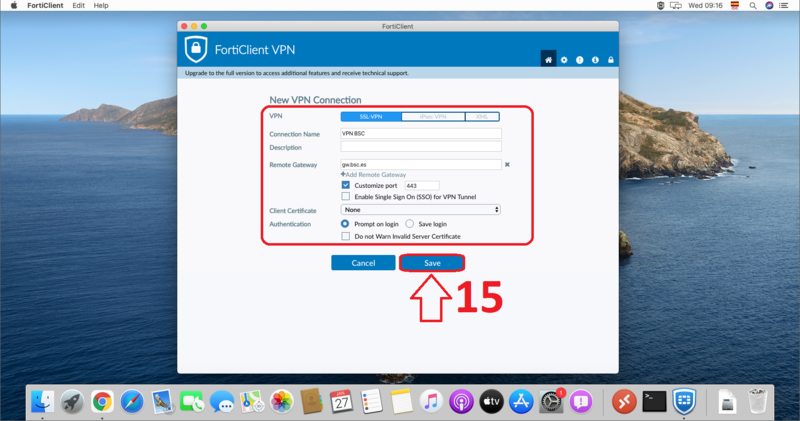
Now, click in “Configure VPN”.
Now, put the following configuration and click in “Save”:
- Name: VPN BSC
- Remote gateway: gw.bsc.es
- Port: 443
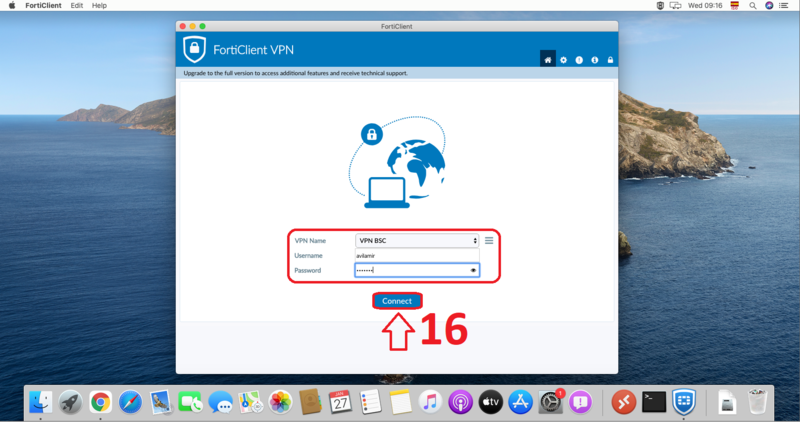
Here, put your BSC user and password and click in “Connect” to establish the connection.
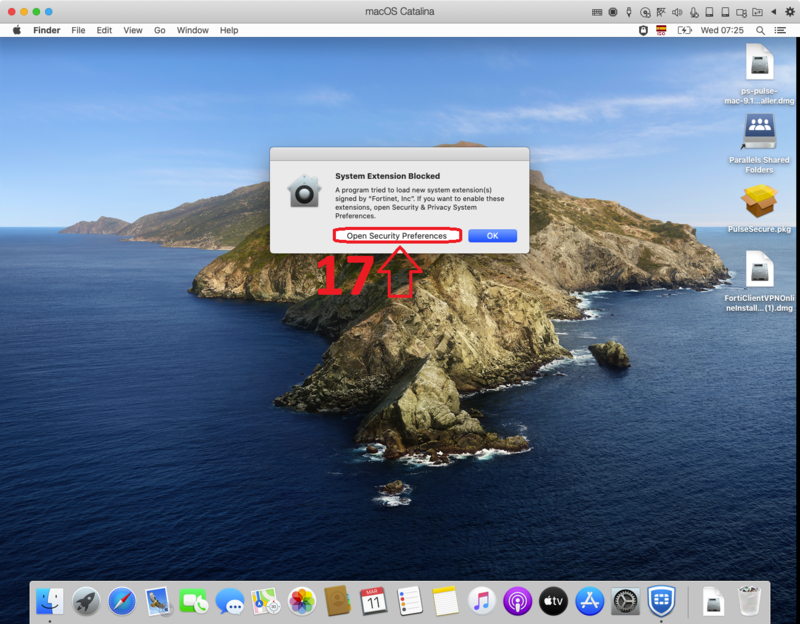
When you connect the VPN for first time, it will ask for additional permissions. So click in “Open Security Preferences”.
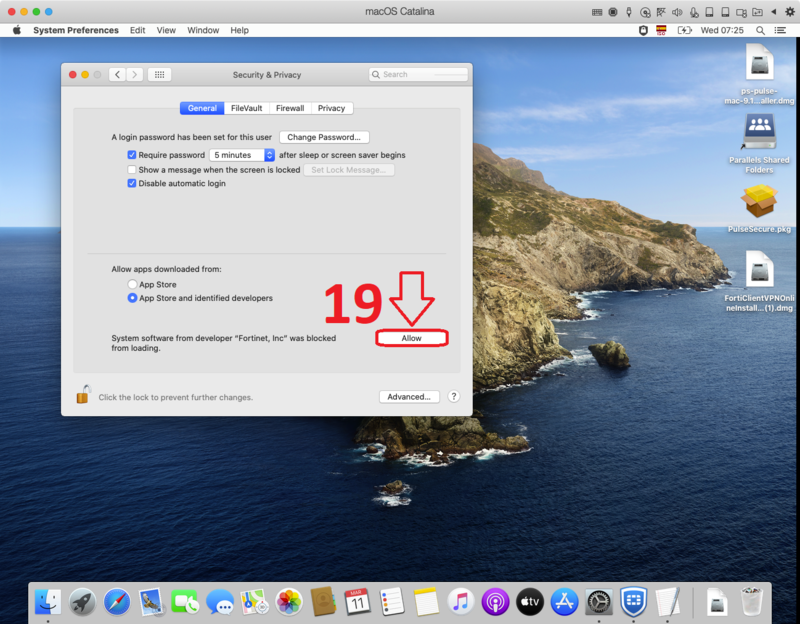
Now, click in the padlock.
And click in “Allow” the software from “Fortinet, Inc”.
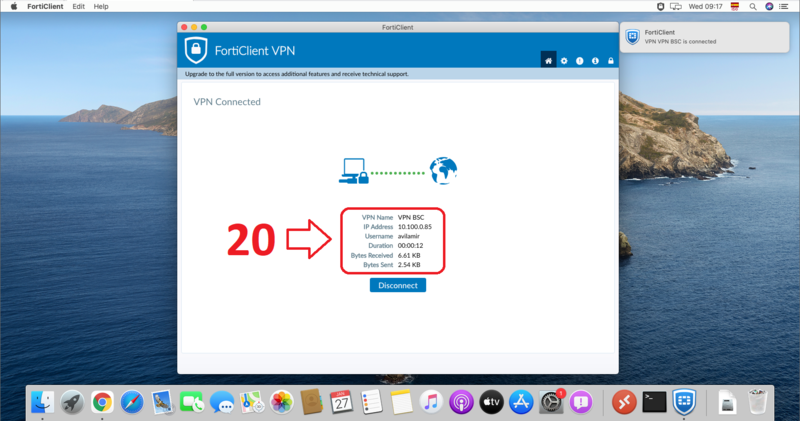
Now, you are connected in the BSC VPN.
OpenSUSE
To install the VPN in OpenSUSE we have 2 methods:
Method 1
This option consist in use Openfortivpn. It depends on your OpenSUSE version you can find the program “openfortivpn” in your OS repository. The minimum version required of openfortivpn is 1.11.
So, to put the VPN using this method, follow the next steps:
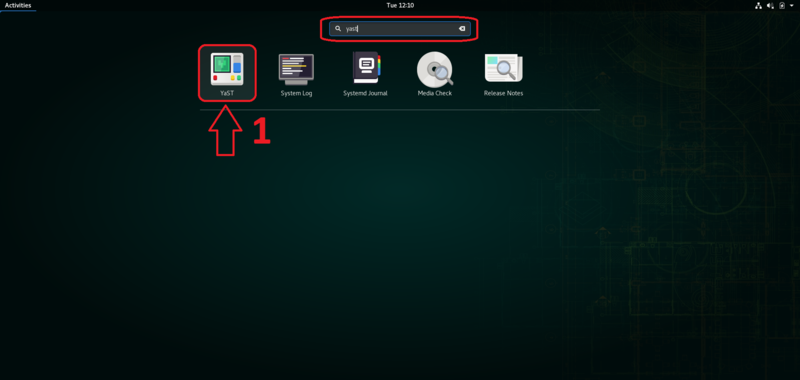
Go in the operating system finder, search “Yast” and click it.
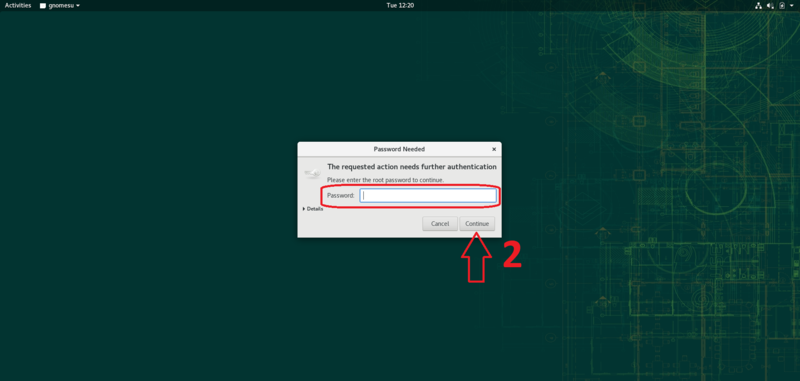
Put the password of “root” user and click in “Continue”.
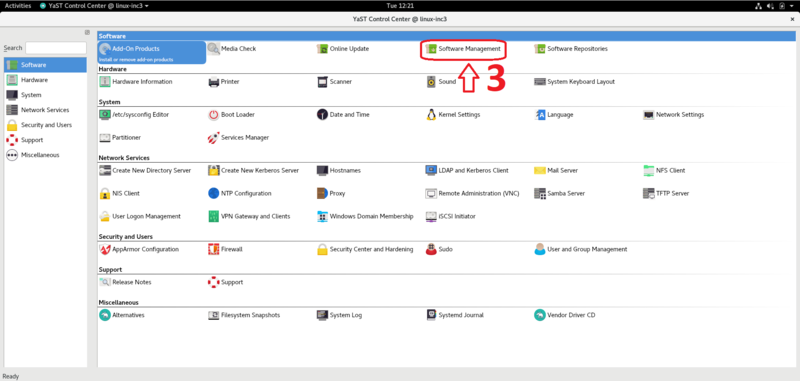
Go in “Software Management”.
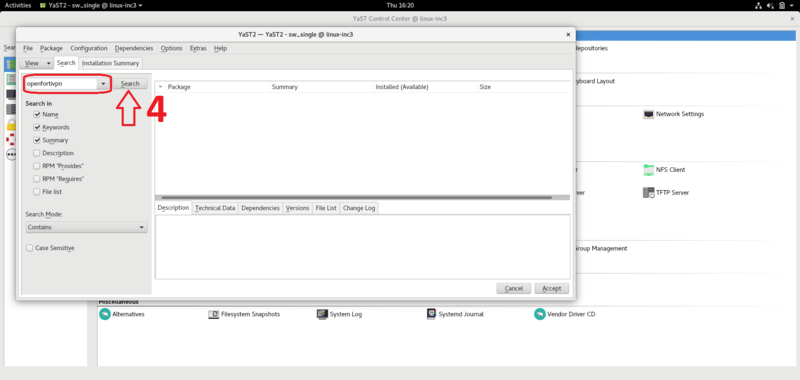
In the finder, put “openfortivpn” and click in search.
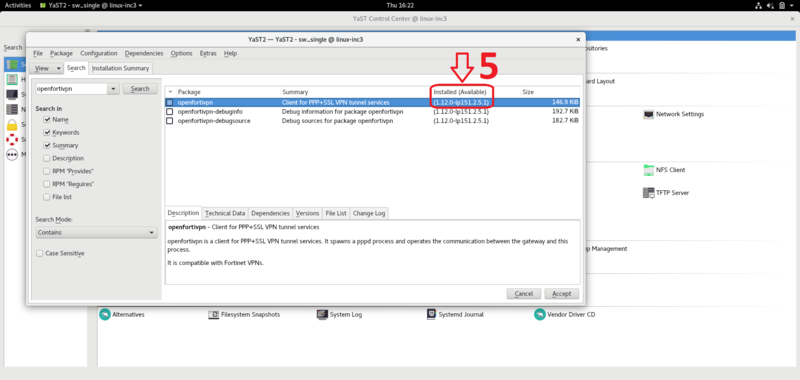
Now, you see the “openfortivpn” package. Before install it, check that the version is at least 1.11.
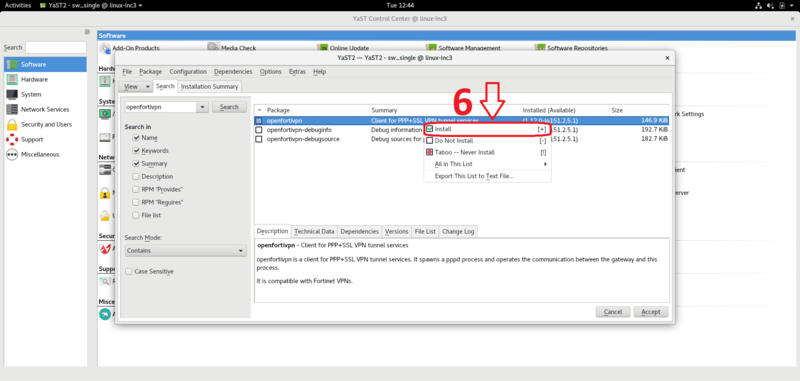
Once you check the version, make right click in “openfortivpn” and click in install.
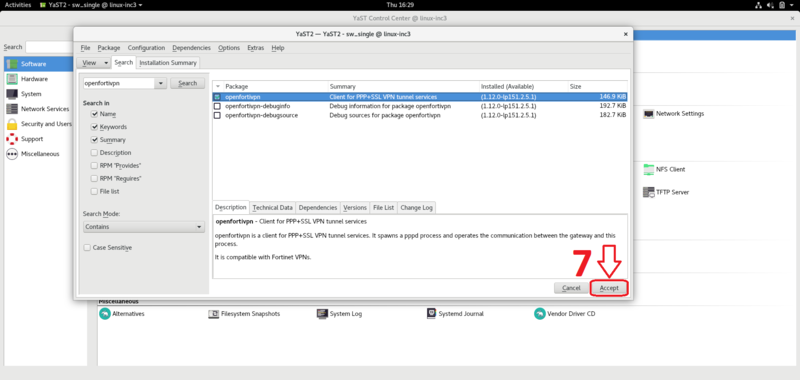
Now, click in “Accept”.
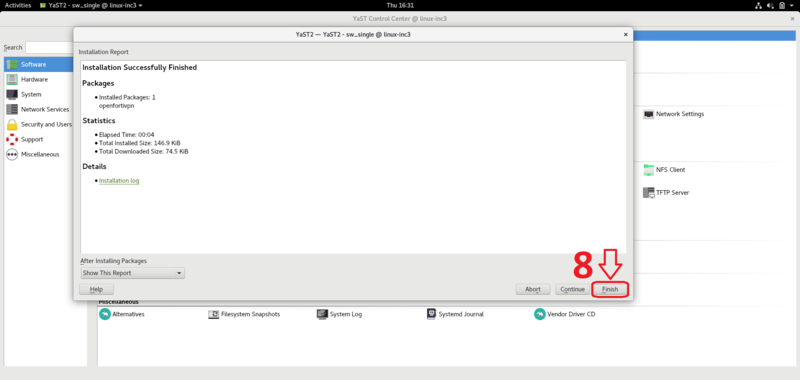
When the installation finish click in “Finish”.
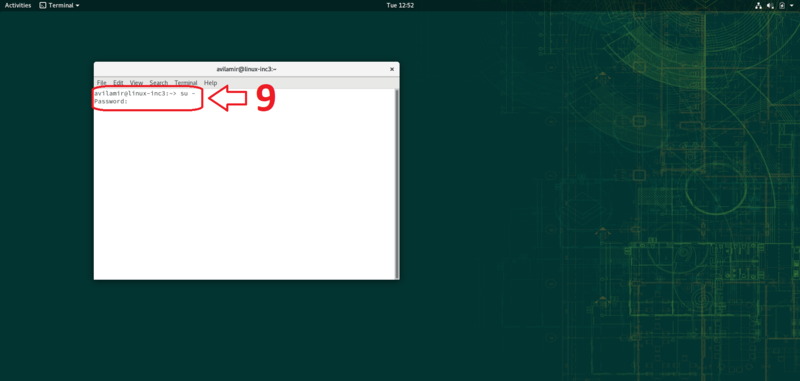
Now, in a terminal put “su -“, make “enter”, and put the password of “root” user.
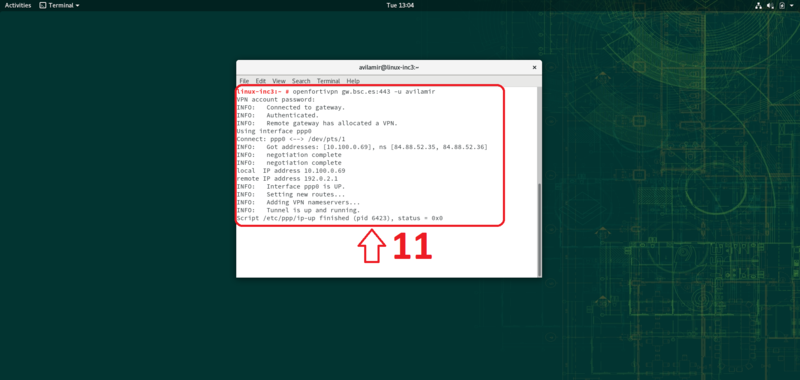
In a terminal put: openfortivpn gw.bsc.es:443 -u yourBSCusername, make “enter” and put your BSC password.
Now, you are connected in the BSC VPN.
Method 2
This option consist in use the official client, Forticlient. So, to put the VPN using this method, follow the next steps:
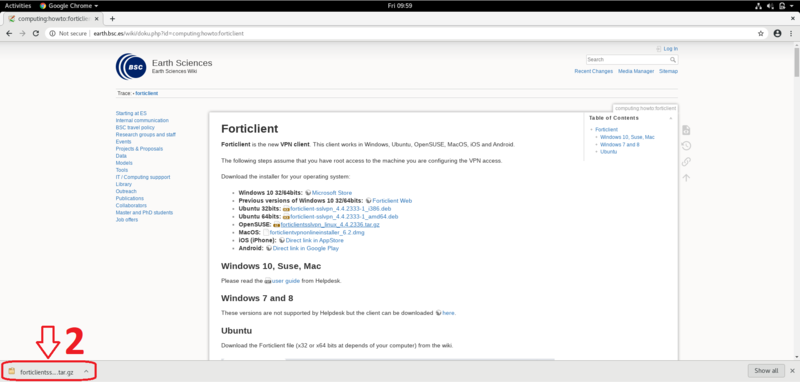
Go in the wiki and download the file for the OpenSUSE VPN.
Click in the downloaded file.
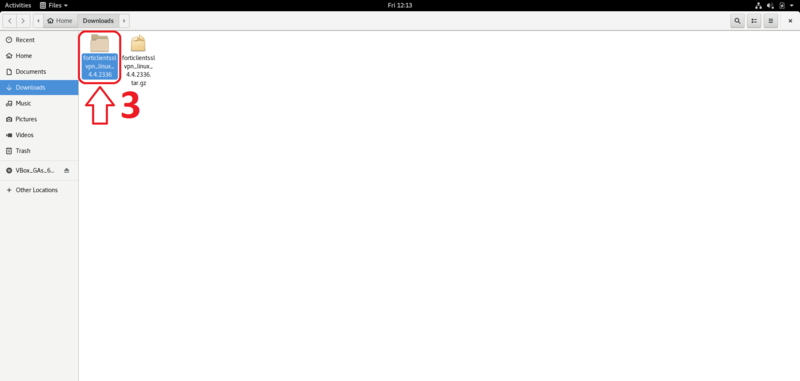
Here you see the downloaded file. Sometimes the system extract automatically the ”.tar.gz” file, if not, extract the file of the downloaded package.
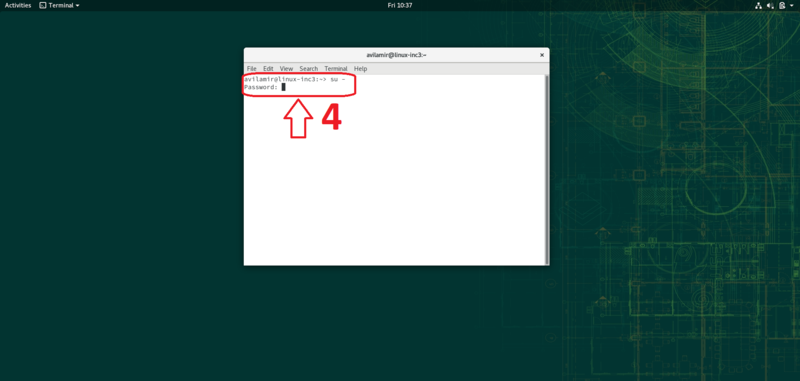
Now, in a terminal, put “su –“, make “enter”, and put the password of “root” user.
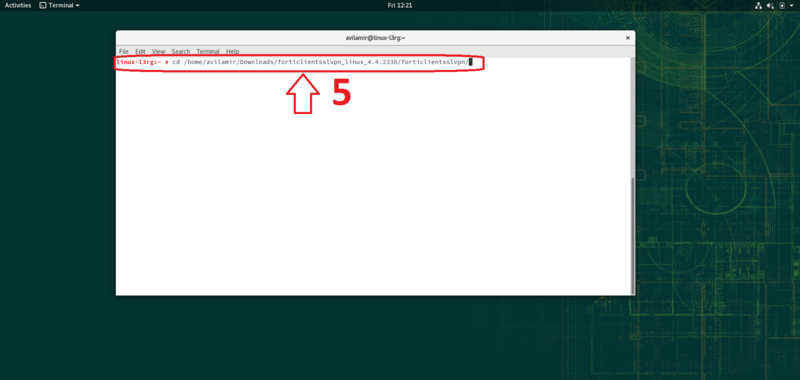
Go in the “forticlientsslvpn” folder inside the downloaded package. In my case, I have this folder in Downloads.
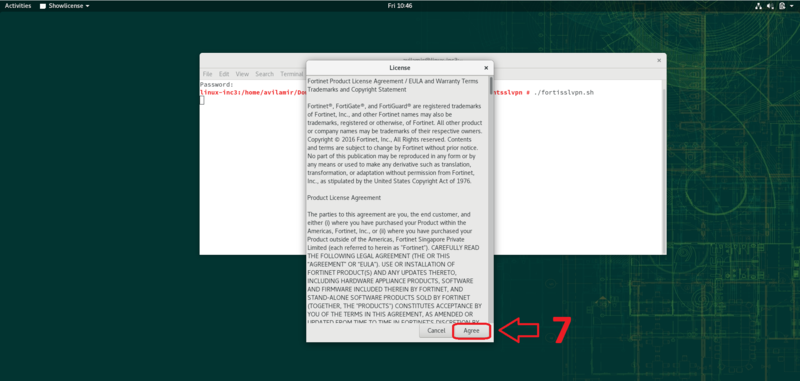
In the terminal put “./fortisslvpn.sh” to execute the VPN script.
Now, has been opened the VPN program. To continue click in “Agree”.
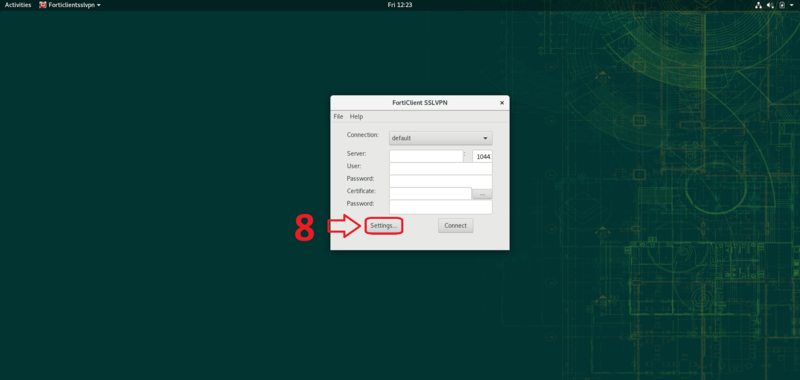
Go in settings.
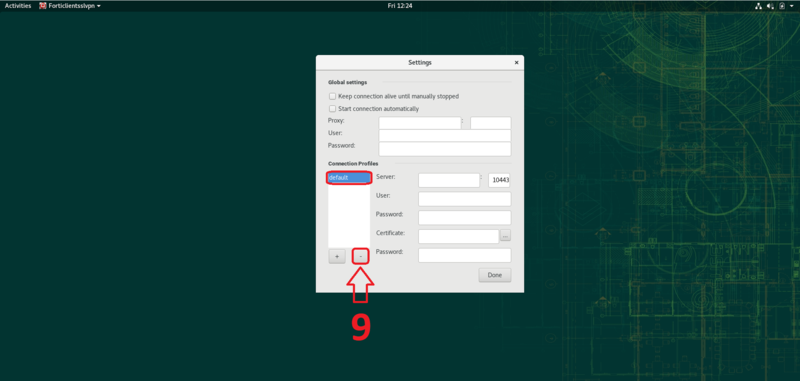
Now, click in “default” and click in the minus sign to remove the “default” connection.
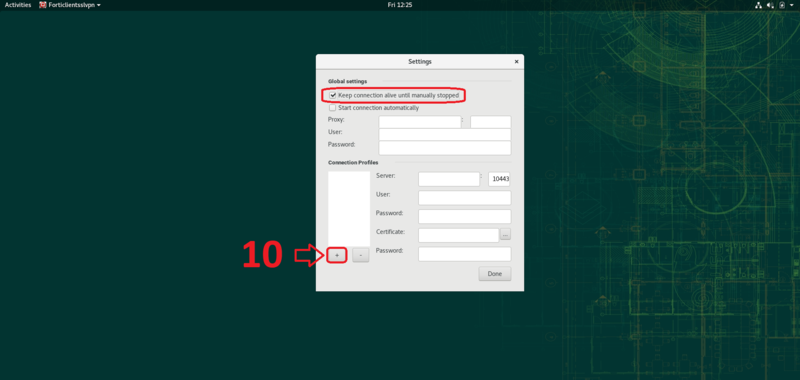
Click in the box “Keep connection alive until manually stopped” and click in the plus sign to add a new connection.
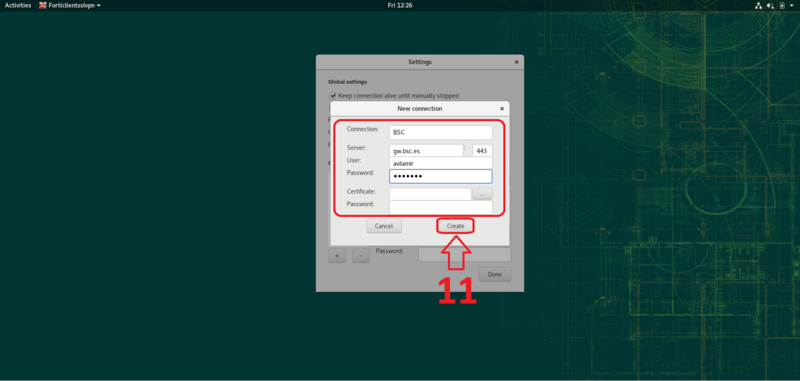
Put the following configuration to create the connection and click “Create” :
- Connection: BSC
- Server: gw.bsc.es
- Port: 443
- User: BSC User
- Password: BSC user password
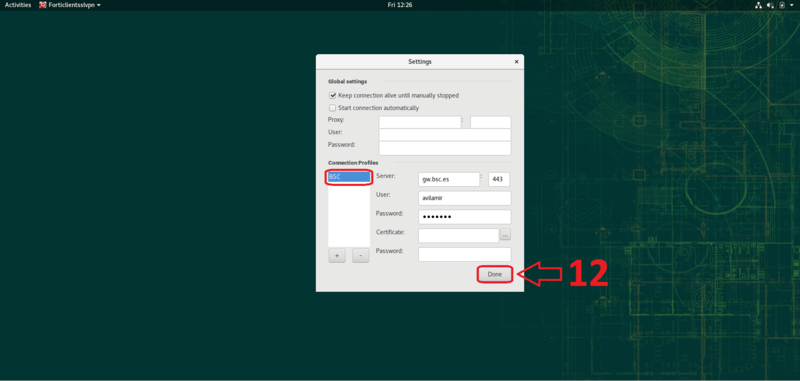
Now, click in “BSC” and “Done”.
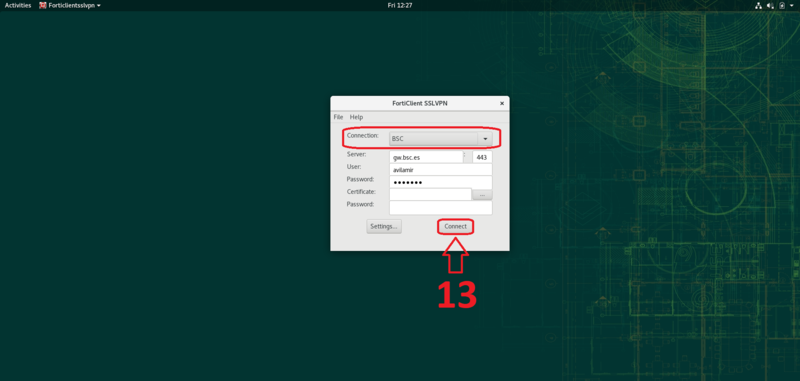
In the drop-down menu click in “BSC” and “Connect”.
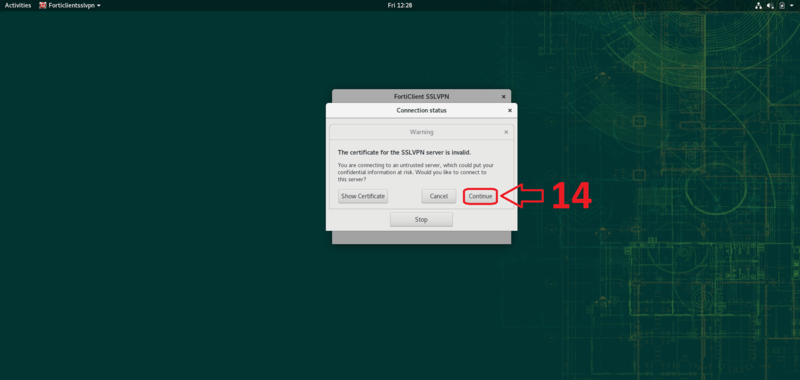
In the certificate window click in “Continue”.
Now, you are connected in the VPN.
Common problems
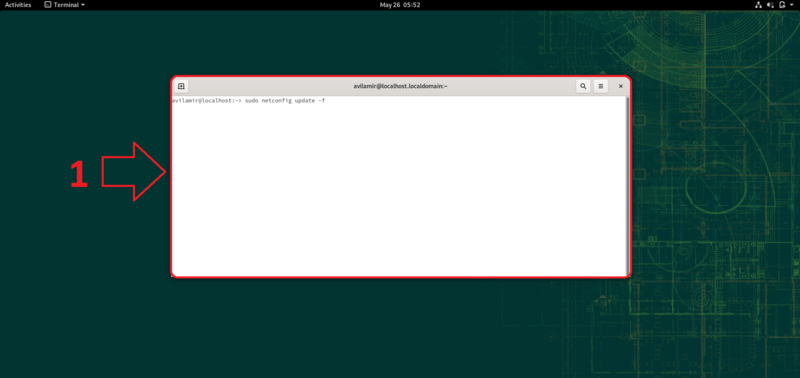
If you have the VPN installed and you have network problems or problems to acces in some websites, in a terminal, put “sudo netconfig update -f” and make enter.
Ubuntu
Download the Forticlient file (x32 or x64 bits at depends of your computer) from the wiki.
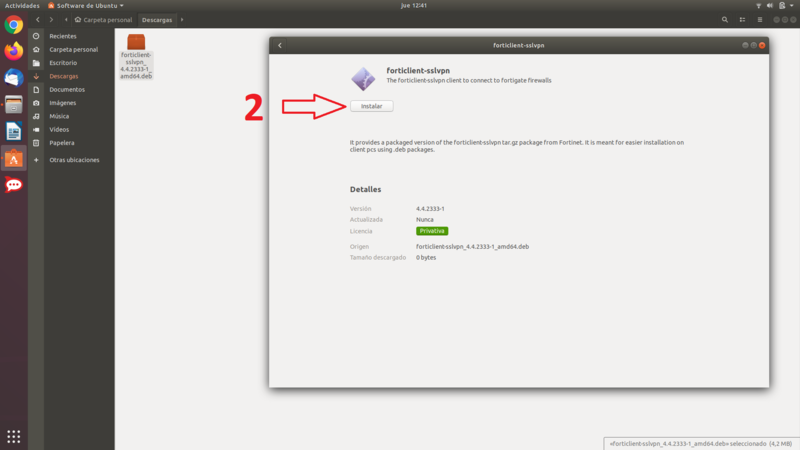
Make double click in the file and install the program.
When the installation finish, open Forticlient.
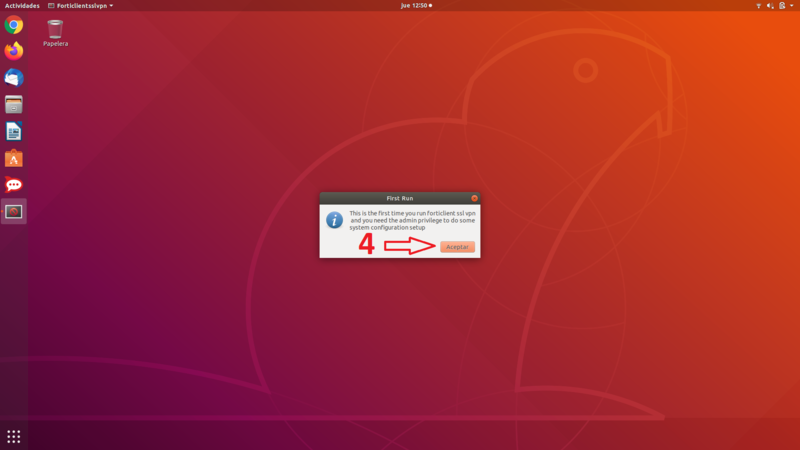
In this window click in accept.
Then click in “Agree”.
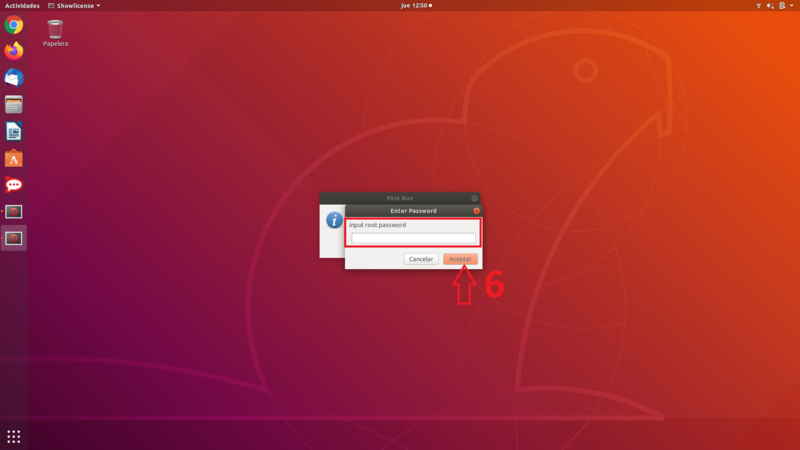
Now put the password of root of your computer and click in accept.
Go in settings.
Now, click in “default” and in the minus sign to remove the “default” connection.
Click in the box “Keep connection alive until manually stopped” and click in the plus sign to add a new connection.
Put the following configuration to create the connection and click “Create” :
- Connection: BSC
- Server: gw.bsc.es
- Port: 443
- User: BSC User
- Password: BSC user password
Now, click in “BSC” and “Done”.
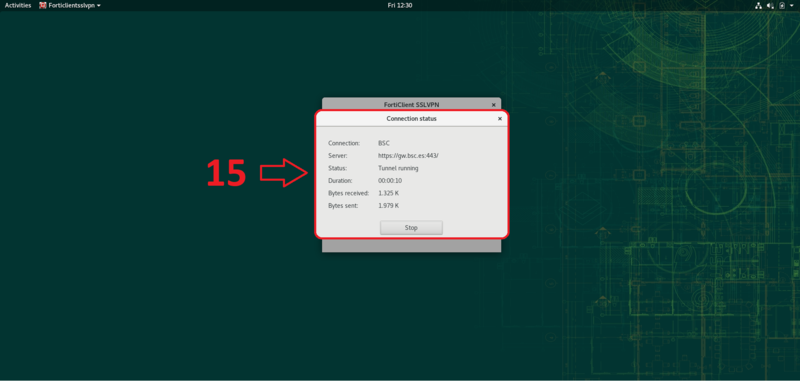
In the drop-down menu click in “BSC” and “Connect”.
In the certificate window click in “Continue”.
Now, you are connected in the VPN.
Android
Go in GooglePlay and click in “Install” to download FortiClient VPN.
Click in Open.
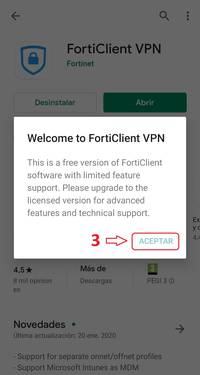
In the Welcome message click in “Accept”.
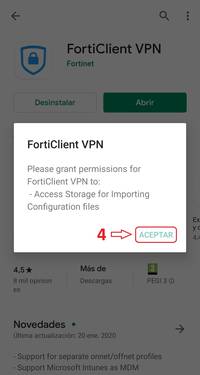
Now, click in “Accept”.
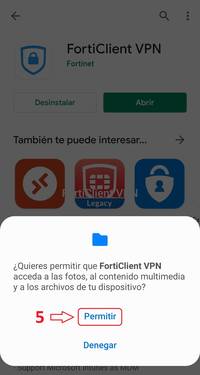
Click in “Allow” to give permissions to Forticlient.
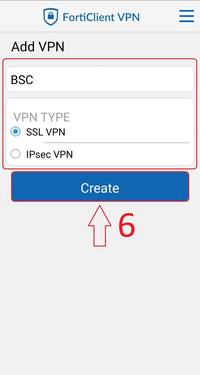
To continue, put the following information and click in “Create”:
- Name: BSC
- VPN TYPE: SSL VPN
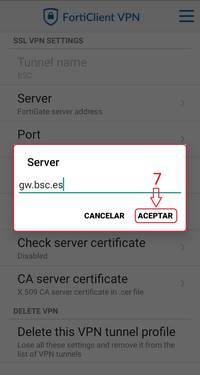
Click in server, put the following information and click in “Accept”:
- Server: gw.bsc.es
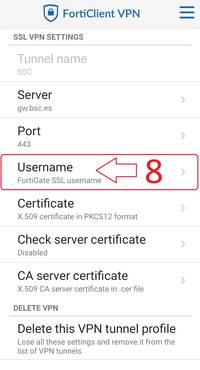
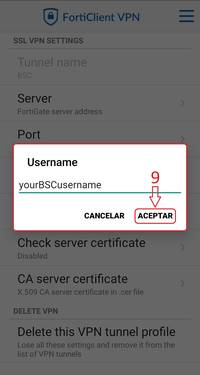
Click in “Username”.
Put your BSC username and click “Accept”.
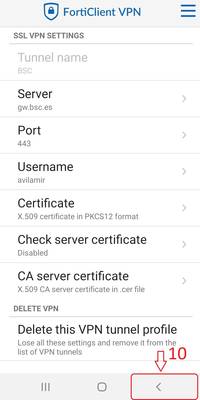
Go back.
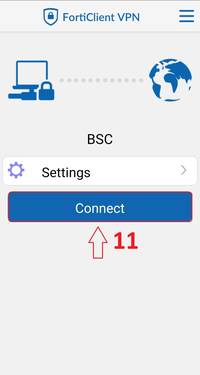
Click in “Connect”.
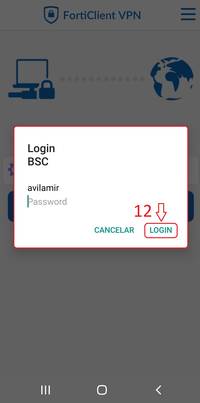
Put your BSC password and click in “Login”.
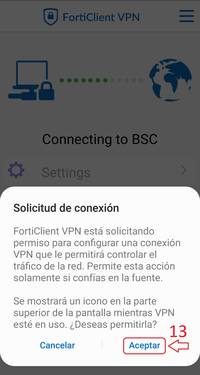
In the message, click in “Accept” to give permissions to the VPN connexion.
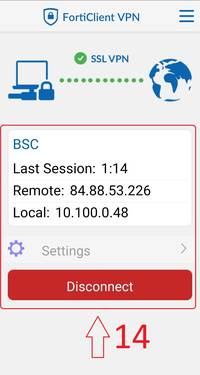
In this moment you are connected in the VPN.
iOS
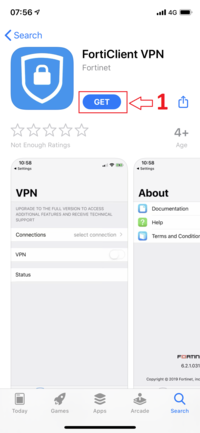
Go in the App Store and download the “FortiClient VPN” app. Be aware that there are other apps but this is the correct one.
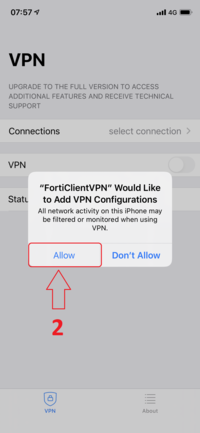
Open the application and accept the licence. It will ask for additional permission, click in “Allow”.
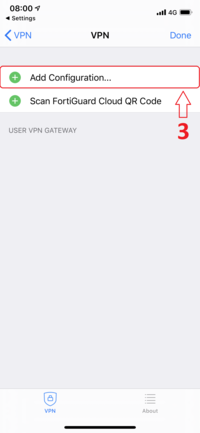
Go in “Connections” > “Select connection” > “Add Configuration…“.
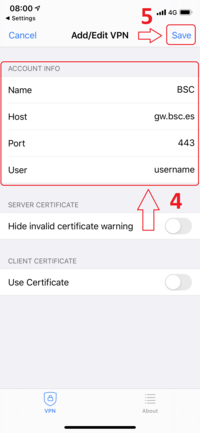
Now, put the following information and click in “Save”:
Account info:
- Name: BSC
- Host: gw.bsc.es
- Port: 443
- User: yourBSCusername
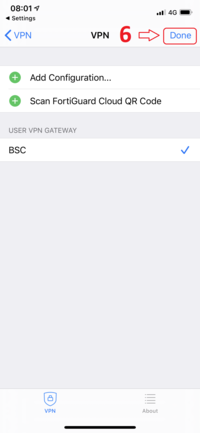
Click in “Done”.
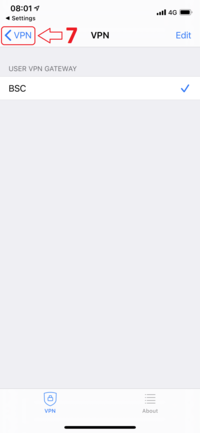
Return to the main VPN screen.
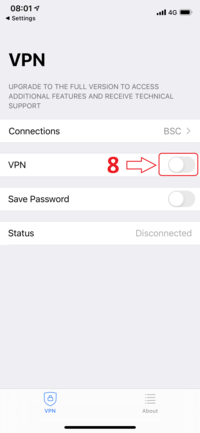
Click in “VPN”.
Now you are connected in the VPN.

