Documentation Style Guide
This document defines the standards for GitLab documentation, including grammar, formatting, word use, and more.
For style questions, mention @tw-style in an issue or merge request. If you have access to the GitLab Slack workspace,
use the #docs-processes channel.
In addition to this page, the following resources can help you craft and contribute to documentation:
- Doc contribution guidelines
- Recommended word list
- Doc style and consistency testing
- Guidelines for UI error messages
- Documentation global navigation
- GitLab Handbook style guidelines
- Microsoft Style Guide
- Google Developer Documentation Style Guide
- Recent updates to this guide
The GitLab voice
The GitLab brand guidelines define the voice used by the larger organization.
Building on that guidance, the voice in the GitLab documentation strives to be concise, direct, and precise. The goal is to provide information that's easy to search and scan.
The voice in the documentation should be conversational but brief, friendly but succinct.
Documentation is the single source of truth (SSOT)
The GitLab documentation is the SSOT for all information related to GitLab implementation, usage, and troubleshooting. It evolves continuously, in keeping with new products and features, and with improvements for clarity, accuracy, and completeness.
This policy prevents information silos, making it easier to find information about GitLab products.
It also informs decisions about the kinds of content we include in our documentation.
The documentation includes all information
Include problem-solving actions that may address rare cases or be considered risky, but provide proper context through fully detailed warnings and caveats. This kind of content should be included as it could be helpful to others and, when properly explained, its benefits outweigh the risks. If you think you have found an exception to this rule, contact the Technical Writing team.
GitLab adds all troubleshooting information to the documentation, no matter how unlikely a user is to encounter a situation.
GitLab Support maintains their own troubleshooting content in the GitLab documentation.
The documentation includes all media types
Include any media types/sources if the content is relevant to readers. You can freely include or link presentations, diagrams, and videos. No matter who it was originally composed for, if it is helpful to any of our audiences, we can include it.
- If you use an image that has a separate source file (for example, a vector or diagram format), link the image to the source file so that anyone can update or reuse it.
- Do not copy and paste content from other sources unless it is a limited quotation with the source cited. Typically it is better to either rephrase relevant information in your own words or link out to the other source.
Topic types
In the software industry, it is a best practice to organize documentation in different types. For example:
- Concepts
- Tasks
- Reference
- Troubleshooting
At GitLab, we have not traditionally used topic types. However, we are starting to move in this direction, so we can address these issues:
- Content is hard to find. Our docs are comprehensive and include a large amount of useful information. Topic types create repeatable patterns that make our content easier to scan and parse.
- Content is often written from the contributor's point of view. Our docs are written by contributors. Topic types (tasks specifically) help put information into a format that is geared toward helping others, rather than documenting how a feature was implemented.
GitLab uses these topic types.
Link instead of repeating text
Rather than repeating information from another topic, link to the single source of truth and explain why it is important.
Docs-first methodology
We employ a documentation-first methodology. This method ensures the documentation remains a complete and trusted resource, and makes communicating about the use of GitLab more efficient.
- If the answer to a question exists in documentation, share the link to the documentation instead of rephrasing the information.
- When you encounter new information not available in GitLab documentation (for example, when working on a support case or testing a feature), your first step should be to create a merge request (MR) to add this information to the documentation. You can then share the MR to communicate this information.
New information that would be useful toward the future usage or troubleshooting of GitLab should not be written directly in a forum or other messaging system, but added to a documentation MR and then referenced, as described above.
The more we reflexively add information to the documentation, the more the documentation helps others efficiently accomplish tasks and solve problems.
If you have questions when considering, authoring, or editing documentation, ask
the Technical Writing team. They're available on Slack in #docs or in GitLab by
mentioning the writer for
the applicable DevOps stage or group.
Otherwise, forge ahead with your best effort. It does not need to be perfect;
the team is happy to review and improve upon your content. Review the
Documentation guidelines before you begin your first documentation MR.
Maintaining a knowledge base separate from the documentation would be against the documentation-first methodology, because the content would overlap with the documentation.
Writing for localization
The GitLab documentation is not localized, but we follow guidelines that help benefit translation. For example, we:
- Write in active voice.
- Write in present tense.
- Avoid words that can be translated incorrectly, like:
- Avoid -ing words.
The GitLab voice dictates that we write clearly and directly, and with translation in mind. The word list and our Vale rules also aid in consistency, which is important for localization.
Markdown
All GitLab documentation is written using Markdown.
The documentation website uses GitLab Kramdown,
a "flavored" Kramdown engine to render pages from Markdown to HTML. The use of Kramdown
features is limited by our linters, so, use regular Markdown and follow the rules in the
linked style guide. You can't use Kramdown-specific markup (for example, {:.class}).
HTML in Markdown
Hard-coded HTML is valid, although it's discouraged from being used. HTML is permitted if:
- There's no equivalent markup in Markdown.
- Advanced tables are necessary.
- Special styling is required.
- Reviewed and approved by a technical writer.
Heading levels in Markdown
Each documentation page begins with a level 1 heading (#). This becomes the h1 element when
the page is rendered to HTML. There can be only one level 1 heading per page.
- For each subsection, increment the heading level. In other words, increment the number of
#characters in front of the topic title. - Avoid heading levels greater than
H5(#####). If you need more than five heading levels, move the topics to a new page instead. Heading levels greater thanH5do not display in the right sidebar navigation. - Do not skip a level. For example:
##>####. - Leave one blank line before and after the topic title.
- If you use code in topic titles, ensure the code is in backticks.
Backticks in Markdown
Use backticks for:
- Code blocks.
- Error messages.
Markdown Rules
GitLab ensures that the Markdown used across all documentation is consistent, as well as easy to review and maintain, by testing documentation changes with markdownlint. This lint test fails when any document has an issue with Markdown formatting that may cause the page to render incorrectly in GitLab. It also fails when a document has non-standard Markdown (which may render correctly, but is not the current standard for GitLab documentation).
Markdown rule MD044/proper-names (capitalization)
A rule that could cause confusion is MD044/proper-names, as it might not be
immediately clear what caused markdownlint to fail, or how to correct the
failure. This rule checks a list of known words, listed in the .markdownlint.yml
file in each project, to verify proper use of capitalization and backticks.
Words in backticks are ignored by markdownlint.
In general, product names should follow the exact capitalization of the official names of the products, protocols, and so on.
Some examples fail if incorrect capitalization is used:
- MinIO (needs capital
IO) - NGINX (needs all capitals)
- runit (needs lowercase
r)
Additionally, commands, parameters, values, filenames, and so on must be included in backticks. For example:
- "Change the
needskeyword in your.gitlab-ci.yml..."-
needsis a parameter, and.gitlab-ci.ymlis a file, so both need backticks. Additionally,.gitlab-ci.ymlwithout backticks fails markdownlint because it does not have capital G or L.
-
- "Run
git cloneto clone a Git repository..."-
git cloneis a command, so it must be lowercase, while Git is the product, so it must have a capital G.
-
Language
GitLab documentation should be clear and easy to understand.
- Avoid unnecessary words.
- Be clear, concise, and stick to the goal of the topic.
- Write in US English with US grammar. (Tested in
British.yml.)
Capitalization
As a company, we tend toward lowercase.
Topic titles
Use sentence case for topic titles. For example:
# Use variables to configure pipelines## Use the To-Do List
UI text
When referring to specific user interface text, like a button label or menu item, use the same capitalization that's displayed in the user interface. Standards for this content are listed in the Pajamas Design System Content section and typically match what's mentioned in this Documentation Style Guide.
If you think the user interface text contains style mistakes, create an issue or an MR to propose a change to the user interface text.
Feature names
- Feature names are typically lowercase.
- Some features require title case, typically nouns that name GitLab-specific capabilities or tools. Features requiring
title case should be:
- Added as a proper name to markdownlint configuration, so that it can be consistently applied across all documentation.
- Added to the word list.
If the term is not in the word list, ask a GitLab Technical Writer for advice.
Do not match the capitalization of terms or phrases on the Features page
or features.yml
by default.
Other terms
Capitalize names of:
- GitLab product tiers. For example,
GitLab Free and GitLab Ultimate. (Tested in
BadgeCapitalization.yml.) - Third-party organizations, software, and products. For example, Prometheus, Kubernetes, Git, and The Linux Foundation.
- Methods or methodologies. For example, Continuous Integration, Continuous Deployment, Scrum, and Agile.
Follow the capitalization style listed at the authoritative source for the entity, which may use non-standard case styles. For example: GitLab and npm.
Fake user information
You may need to include user information in entries such as a REST call or user profile. Do not use real user information or email addresses in GitLab documentation. For email addresses and names, use:
- Email addresses: Use an email address ending in
example.com. - Names: Use strings like
example_username. Alternatively, use diverse or non-gendered names with common surnames, such asSidney Jones,Zhang Wei, orAlex Garcia.
Fake URLs
When including sample URLs in the documentation, use:
-
example.comwhen the domain name is generic. -
gitlab.example.comwhen referring only to self-managed GitLab instances. Usegitlab.comfor GitLab SaaS instances.
Fake tokens
There may be times where a token is needed to demonstrate an API call using cURL or a variable used in CI. It is strongly advised not to use real tokens in documentation even if the probability of a token being exploited is low.
You can use these fake tokens as examples:
| Token type | Token value |
|---|---|
| Personal access token | <your_access_token> |
| Application ID | 2fcb195768c39e9a94cec2c2e32c59c0aad7a3365c10892e8116b5d83d4096b6 |
| Application secret | 04f294d1eaca42b8692017b426d53bbc8fe75f827734f0260710b83a556082df |
| CI/CD variable | Li8j-mLUVA3eZYjPfd_H |
| Project runner token | yrnZW46BrtBFqM7xDzE7dddd |
| Shared runner token | 6Vk7ZsosqQyfreAxXTZr |
| Trigger token | be20d8dcc028677c931e04f3871a9b |
| Webhook secret token | 6XhDroRcYPM5by_h-HLY |
| Health check token | Tu7BgjR9qeZTEyRzGG2P |
Contractions
Contractions are encouraged, and can create a friendly and informal tone, especially in tutorials, instructional documentation, and user interfaces.
Some contractions, however, should be avoided:
| Do not use a contraction | Example | Use instead |
|---|---|---|
| With a proper noun and a verb | The Container Registry's a powerful feature. | The Container Registry is a powerful feature. |
| To emphasize a negative | Don't install X with Y. | Do not install X with Y. |
| In reference documentation | Don't set a limit. | Do not set a limit. |
| In error messages | Requests to localhost aren't allowed. | Requests to localhost are not allowed. |
Possessives
Try to avoid using possessives ('s) for proper nouns, like organization or product names.
For example, instead of Docker's CLI, use the Docker CLI.
For details, see the Google documentation style guide.
Prepositions
Use prepositions at the end of the sentence when needed. Dangling or stranded prepositions are fine. For example:
- You can leave the group you're a member of.
- Share the credentials with users you want to give access to.
These constructions are more casual than the alternatives:
- You can leave the group of which you're a member.
- Share the credentials with users to which you want to give access.
Acronyms
If you use an acronym, spell it out on first use on a page. You do not need to spell it out more than once on a page.
- Titles: Try to avoid acronyms in topic titles, especially if the acronym is not widely used.
-
Plurals: Try not to make acronyms plural. For example, use
YAML files, notYAMLs. If you must make an acronym plural, do not use an apostrophe. For example, useAPIs, notAPI's. - Possessives: Use caution when making an acronym possessive. If possible, write the sentence to avoid making the acronym possessive. If you must make the acronym possessive, consider spelling out the words.
Numbers
When using numbers in text, spell out zero through nine, and use numbers for 10 and greater. For details, see the Microsoft Style Guide.
Text
-
Splitting long lines (preferably up to 100 characters) can make it easier to provide feedback on small chunks of text.
-
Insert an empty line for new paragraphs.
-
Insert an empty line between different markups (for example, after every paragraph, header, list, and so on). Example:
## Header

Paragraph.

- List item 1
- List item 2
Comments
To embed comments within Markdown, use standard HTML comments that are not rendered when published. Example:
<!-- This is a comment that is not rendered -->Emphasis
Use bold rather than italic to provide emphasis. GitLab uses a sans-serif font and italic text does not stand out as much as it would in a serif font. For details, see Butterick's Practical Typography guide on bold or italic.
You can use italics when you are introducing a term for the first time. Otherwise, use bold.
- Use double asterisks (
**) to mark a word or text in bold (**bold**). - Use underscore (
_) for text in italics (_italic_). - Use greater than (
>) for blockquotes.
Punctuation
Follow these guidelines for punctuation.
- End full sentences with a period.
- Use serial (Oxford) commas before the final and or or in a list of three or more items. (Tested in
OxfordComma.yml.)
When spacing content:
- Use one space between sentences. (Use of more than one space is tested in
SentenceSpacing.yml.) - Do not use non-breaking spaces. Use standard spaces instead. (Tested in
lint-doc.sh.) - Do not use tabs for indentation. Use spaces instead. You can configure your code editor to output spaces instead of tabs when pressing the Tab key.
Do not use these punctuation characters:
-
;(semicolon): Use two sentences instead. -
–(en dash) or—(em dash): Use separate sentences, or commas, instead. -
“”‘’: Double or single typographer's ("curly") quotation marks. Use straight quotes instead. (Tested inNonStandardQuotes.yml.)
Placeholder text
You might want to provide a command or configuration that uses specific values.
In these cases, use < and >
to call out where a reader must replace text with their own value.
For example:
cp <your_source_directory> <your_destination_directory>Keyboard commands
Use the HTML <kbd> tag when referring to keystroke presses. For example:
To stop the command, press <kbd>Control</kbd>+<kbd>C</kbd>.When the docs are generated, the output is:
To stop the command, press Control+C.
Text entered in the UI
If you want the user to type something in the UI, use backticks. For example:
In the **Commit message** box, type `This is my merge request`.Backticks are more precise than quotes. For example, in this string:
- In the Commit message box, type "This is my merge request."
It's not clear whether the user should include the period in the string.
Inline code
Inline code style is applied inline with regular text. Use inline code style:
- For filenames or fragments of configuration files. For example,
.gitlab-ci.yml,CODEOWNERS, andonly: [main]. - For HTTP methods (
HTTP POST) and HTTP status codes, both full (404 File Not Found) and abbreviated (404). For example: Send aDELETErequest to delete the runner. Send aPOSTrequest to create one.
To apply inline code style, wrap the text in a single backtick (`). For example, this is inline code style.
Code blocks
Code block style separates code text from regular text. Use code block style for commands run in the command-line interface. Code block style is easier to copy and paste in a user's terminal window.
To apply code block style, wrap the text in triple backticks (three `) and add a syntax highlighting hint. For
example:
```plaintext
This is codeblock style
```
When using code block style:
- Use quadruple backticks (four
`) to apply code block style when the code block you are styling has triple backticks in it. For example, when illustrating code block style. - Add a blank line above and below code blocks.
- Syntax highlight hints are required for code blocks. See the
list of supported languages and lexers
for available syntax highlighters. Use
plaintextif no better hint is available.
Lists
-
Do not use a period if the phrase is not a full sentence.
-
Use a period after every sentence. Do not use semicolons or commas.
-
Majority rules. All items should have the same punctuation.
-
Start list items with a capital letter.
-
Separate the introductory phrase from explanatory text with a colon (
:). For example:You can: - Do this thing. - Do this other thing.
Choose between an ordered or unordered list
Use ordered lists for a sequence of steps. For example:
Follow these steps to do something.

1. First, do the first step.
1. Then, do the next step.
1. Finally, do the last step.
Use an unordered lists when the steps do not need to be completed in order. For example:
These things are imported:

- Thing 1
- Thing 2
- Thing 3
List markup
- Use dashes (
-) for unordered lists instead of asterisks (*). - Start every item in an ordered list with
1.. When rendered, the list items are sequential. - Leave a blank line before and after a list.
- Begin a line with spaces (not tabs) to denote a nested sub-item.
Nesting inside a list item
You can nest items under a list item, so they render with the same indentation as the list item. You can do this with:
Nested items should always align with the first character of the list
item. For unordered lists (using -), use two spaces for each level of
indentation:
- Unordered list item 1
A line nested using 2 spaces to align with the `U` above.
- Unordered list item 2
> A quote block that will nest
> inside list item 2.
- Unordered list item 3
```plaintext
a code block that nests inside list item 3
```
- Unordered list item 4
For ordered lists, use three spaces for each level of indentation:
1. Ordered list item 1

   A line nested using 3 spaces to align with the `O` above.
You can nest lists in other lists.
1. Ordered list item one.
1. Ordered list item two.
   - Nested unordered list item one.
   - Nested unordered list item two.
1. Ordered list item three.

- Unordered list item one.
- Unordered list item two.
  1. Nested ordered list item one.
  1. Nested ordered list item two.
- Unordered list item three.
Tables
Tables should be used to describe complex information in a straightforward manner. Note that in many cases, an unordered list is sufficient to describe a list of items with a single, simple description per item. But, if you have data that's best described by a matrix, tables are the best choice.
Creation guidelines
To keep tables accessible and scannable, tables should not have any empty cells. If there is no otherwise meaningful value for a cell, consider entering N/A for 'not applicable' or None.
To help tables be easier to maintain, consider adding additional spaces to the column widths to make them consistent. For example:
| App name | Description          | Requirements   |
|:---------|:---------------------|:---------------|
| App 1    | Description text 1.  | Requirements 1 |
| App 2    | Description text 2.  | None           |
Consider installing a plugin or extension in your editor for formatting tables:
- Markdown Table Prettifier for Visual Studio Code
- Markdown Table Formatter for Sublime Text
- Markdown Table Formatter for Atom
Table headings
Use sentence case for table headings. For example, Keyword value or Project name.
Feature tables
When creating tables of lists of features (such the features available to each role on the Permissions page), use these phrases:
| Option | Markdown | Displayed result |
|---|---|---|
| No | **{dotted-circle}** No |
{dotted-circle} No |
| Yes | **{check-circle}** Yes |
{check-circle} Yes |
Footnotes
To indicate a footnote, use the HTML tag <sup> with a number.
Put the tag at the end of the sentence or term.
For the footnotes below the table, use a bold number followed by a sentence.
For example:
| App name | Description                      |
|:---------|:---------------------------------|
| App A    | Description text. <sup>1</sup>   |
| App B    | Description text. <sup>2</sup>   |

1. This is the footnote.
1. This is the other footnote.
This text renders this output:
| App name | Description |
|---|---|
| App A | Description text. 1 |
| App B | Description text. 2 |
- This is the footnote.
- This is the other footnote.
Quotes
Valid for Markdown content only, not for front matter entries:
- Standard quotes: double quotes (
"). Example: "This is wrapped in double quotes". - Quote inside a quote: double quotes (
") wrap single quotes ('). Example: "This sentence 'quotes' something in a quote".
For other punctuation rules, refer to the Pajamas Design System Punctuation section. This is overridden by the documentation-specific punctuation rules.
Links
Links help the docs adhere to the single source of truth principle.
However, you should avoid putting too many links on any page. Too many links can hinder readability.
- Do not duplicate links on the same page. For example, on Page A, do not link to Page B multiple times.
- Avoid multiple links in a single paragraph.
- Avoid multiple links in a single task.
- On any one page, try not to use more than 15 links to other pages.
- Consider using Related topics to reduce links that interrupt the flow of a task.
- Try to avoid anchor links to sections on the same page. Let users rely on the right navigation instead.
Links within the same repository
To link to another page in the same repository,
use a relative file path. For example, ../user/gitlab_com/index.md.
Use inline link Markdown markup [Text](https://example.com),
rather than reference-style links, like [Text][identifier].
Put the entire link on a single line so that linters can find it.
Links in separate repositories
To link to a page in a different repository, use an absolute URL.
For example, to link from a page in the GitLab repository to the Charts repository,
use a URL like https://docs.gitlab.com/charts/.
Anchor links
Each topic title has an anchor link. For example, a topic with the title
## This is an example has the anchor #this-is-an-example.
The first topic title on a page (the h1) has an anchor link,
but do not use it. Link to the page instead.
If a topic title has a product tier badge,
do not include it in the anchor link. For example, for the topic
## This is an example **(FREE)**, use the anchor #this-is-an-example.
With Kramdown, you can add a custom ID to an HTML element, but these IDs
don't work in /help, so you should not use them.
When you change topic title text, the anchor link changes. To avoid broken links:
- Do not use step numbers in topic titles.
- When possible, do not use words that might change in the future.
Changing links and titles
When you change a topic title, the anchor link changes. To ensure you update any related links, search these directories:
doc/*app/views/*ee/app/views/*
If you do not fix these links, the ui-docs-lint job
in your merge request fails.
Text for links
Follow these guidelines for link text.
Standard text
As much as possible, use text that follows one of these patterns:
-
For more information, see [LINK TEXT](LINK). To [DO THIS THING], see [LINK TEXT](LINK)
For example:
For more information, see [merge requests](LINK).To create a review app, see [review apps](LINK).
You can expand on this text by using phrases like
For more information about this feature, see...
Do not to use the following constructions:
Learn more about...-
To read more.... For more information, see the [Merge requests](LINK) page.For more information, see the [Merge requests](LINK) documentation.
Descriptive text rather than here
Use descriptive text for links, rather than words like here or this page.
For example, instead of:
For more information, see [this page](LINK).For more information, go [here](LINK).
Use:
-
For more information, see [merge requests](LINK).
Links to issues
When linking to an issue, include the issue number in the link. For example:
For more information, see [issue 12345](LINK).
Do not use the pound sign (issue #12345).
Links to external documentation
When possible, avoid links to external documentation. These links can easily become outdated, and are difficult to maintain.
Sometimes links are required. They might clarify troubleshooting steps or help prevent duplication of content. Sometimes they are more precise and will be maintained more actively.
For each external link you add, weigh the customer benefit with the maintenance difficulties.
Links requiring permissions
Don't link directly to:
- Confidential issues.
- Project features that require special permissions to view.
These fail for:
- Those without sufficient permissions.
- Automated link checkers.
Instead:
- To reduce confusion, mention in the text that the information is either:
- Contained in a confidential issue.
- Requires special permission to a project to view.
- Provide a link in back ticks (
`) so that those with access to the issue can navigate to it.
Example:
For more information, see the [confidential issue](../../../user/project/issues/confidential_issues.md) `https://gitlab.com/gitlab-org/gitlab-foss/-/issues/<issue_number>`.Link to specific lines of code
When linking to specific lines in a file, link to a commit instead of to the branch. Lines of code change over time. Linking to a line by using the commit link ensures the user lands on the line you're referring to. The Permalink button, displayed when viewing a file in a project, provides a link to the most recent commit of that file.
- Do:
[link to line 3](https://gitlab.com/gitlab-org/gitlab/-/blob/11f17c56d8b7f0b752562d78a4298a3a95b5ce66/.gitlab/issue_templates/Feature%20proposal.md#L3) - Don't:
[link to line 3](https://gitlab.com/gitlab-org/gitlab/-/blob/master/.gitlab/issue_templates/Feature%20proposal.md#L3).
If that linked expression has changed line numbers due to additional commits, you can still search the file for that query. In this case, update the document to ensure it links to the most recent version of the file.
Navigation
When documenting how to navigate through the GitLab UI:
- Always use location, then action.
- From the Visibility dropdown list (location), select Public (action).
- Be brief and specific. For example:
- Do: Select Save.
- Do not: Select Save for the changes to take effect.
- If a step must include a reason, start the step with it. This helps the user scan more quickly.
- Do: To view the changes, in the merge request, select the link.
- Do not: Select the link in the merge request to view the changes.
Names for menus
Use these terms when referring to the main GitLab user interface elements:
- Top bar: This is the top bar that spans the width of the user interface. It includes the menu, the GitLab logo, search field, counters, and the user's avatar.
- Left sidebar: This is the navigation sidebar on the left of the user interface, specific to the project or group.
- Right sidebar: This is the navigation sidebar on the right of the user interface, specific to the open issue, merge request, or epic.
Names for UI elements
UI elements, like button and checkbox names, should be bold. Guidance for each individual UI element is in the word list.
How to write navigation task steps
To be consistent, use these templates when you write navigation steps in a task topic.
To open project settings:
1. On the top bar, select **Main menu > Projects** and find your project.
1. On the left sidebar, select **Settings > CI/CD**.
1. Expand **General pipelines**.
To open group settings:
1. On the top bar, select **Main menu > Groups** and find your group.
1. On the left sidebar, select **Settings > CI/CD**.
1. Expand **General pipelines**.
To open either project or group settings:
1. On the top bar, select **Main menu**, and:
   - For a project, select **Projects** and find your project.
   - For a group, select **Groups** and find your group.
1. On the left sidebar, select **Settings > CI/CD**.
1. Expand **General pipelines**.
To create a project:
1. On the top bar, select **Create new... > New project**.To create a group:
1. On the top bar, select **Create new... > New group**.To open the Admin Area:
1. On the top bar, select **Main menu > Admin**.To select your avatar:
1. On the top bar, in the upper-right corner, select your avatar.To save the selection in some dropdown lists:
1. Go to your issue.
1. On the right sidebar, in the **Iteration** section, select **Edit**.
1. From the dropdown list, select the iteration to associate this issue with.
1. Select any area outside the dropdown list.
Optional steps
If a step is optional, start the step with the word Optional followed by a period.
For example:
1. Optional. Enter a description for the job.Recommended steps
If a step is recommended, start the step with the word Recommended followed by a period.
For example:
1. Recommended. Enter a description for the job.Documenting multiple fields at once
If the UI text sufficiently explains the fields in a section, do not include a task step for every field. Instead, summarize multiple fields in a single task step.
Use the phrase Complete the fields.
For example:
- On the top bar, select Main menu > Projects and find your project.
- On the left sidebar, select Settings > Repository.
- Expand Push rules.
- Complete the fields.
If you are documenting multiple fields and only one field needs explanation, do it in the same step:
- Expand Push rules.
- Complete the fields. Branch name must be a regular expression.
To describe multiple fields, use unordered list items:
- Expand General pipelines.
- Complete the fields.
- Branch name must be a regular expression.
- User must be a user with at least the Maintainer role.
Images
Images, including screenshots, can help a reader better understand a concept. However, they should be used sparingly because:
- They tend to become out-of-date.
- They are difficult and expensive to localize.
- They cannot be read by screen readers.
When needed, use images to help the reader understand:
- Where they are in a complicated process.
- How they should interact with the application.
Capture the image
When you take screenshots:
-
Ensure it provides value. Don't use
lorem ipsumtext. Try to replicate how the feature would be used in a real-world scenario, and use realistic text. - Capture only the relevant UI. Don't include unnecessary white space or areas of the UI that don't help illustrate the point. The sidebars in GitLab can change, so don't include them in screenshots unless absolutely necessary.
- Keep it small. If you don't need to show the full width of the screen, don't. Reduce the size of your browser window as much as possible to keep elements close together and reduce empty space. Try to keep the screenshot dimensions as small as possible.
- Review how the image renders on the page. Preview the image locally or use the review app in the merge request. Make sure the image isn't blurry or overwhelming.
- Be consistent. Coordinate screenshots with the other screenshots already on a documentation page for a consistent reading experience. Ensure your navigation theme is Indigo and the syntax highlighting theme is Light. These are the default preferences.
Add callouts
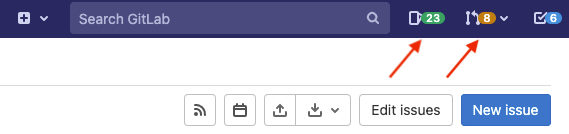
If you need to emphasize an area in a screenshot, use an arrow.
- For color, use
#EE2604. If you use the Preview application on macOS, this is the default red. - For the line width, use 3 pt. If you use the Preview application on macOS, this is the third line in the list.
- Use the arrow style shown in the following image.
- If you have multiple arrows, make them parallel when possible.
Save the image
- Resize any wide or tall screenshots if needed, but make sure the screenshot is still clear after being resized and compressed.
- All images must be compressed to 100KB or less. In many cases, 25-50KB or less is often possible without reducing image quality.
- Save the image with a lowercase filename that's descriptive of the feature
or concept in the image:
- If the image is of the GitLab interface, append the GitLab version to the filename,
based on this format:
image_name_vX_Y.png. For example, for a screenshot taken from the pipelines page of GitLab 11.1, a valid name ispipelines_v11_1.png. - If you're adding an illustration that doesn't include parts of the user interface,
add the release number corresponding to the release the image was added to.
For an MR added to 11.1's milestone, a valid name for an illustration is
devops_diagram_v11_1.png.
- If the image is of the GitLab interface, append the GitLab version to the filename,
based on this format:
- Place images in a separate directory named
img/in the same directory where the.mddocument that you're working on is located. - Consider using PNG images instead of JPEG.
- Compress GIFs with https://ezgif.com/optimize or similar tool.
- Images should be used (only when necessary) to illustrate the description of a process, not to replace it.
- See also how to link and embed videos to illustrate the documentation.
Add the image link to content
The Markdown code for including an image in a document is:

The image description is the alt text for the rendered image on the documentation site. For accessibility and SEO, use descriptions that:
- Are accurate, succinct, and unique.
- Don't use image of or graphic of to describe the image.
Compress images
You should always compress any new images you add to the documentation. One
known tool is pngquant, which is cross-platform and
open source. Install it by visiting the official website and following the
instructions for your OS.
If you use macOS and want all screenshots to be compressed automatically, read One simple trick to make your screenshots 80% smaller.
GitLab has a Ruby script
that you can use to simplify the manual process. In the root directory of your local
copy of https://gitlab.com/gitlab-org/gitlab, run in a terminal:
-
Before compressing, if you want, check that all documentation PNG images have been compressed:
bin/pngquant lint -
Compress all documentation PNG images using
pngquant:bin/pngquant compress -
Compress specific files:
bin/pngquant compress doc/user/img/award_emoji_select.png doc/user/img/markdown_logo.png -
Compress all PNG files in a specific directory:
bin/pngquant compress doc/user/img
Animated images
Avoid using animated images (such as animated GIFs). They can be distracting and annoying for users.
If you're describing a complicated interaction in the user interface and want to include a visual representation to help readers understand it, you can:
- Use a static image (screenshot) and if necessary, add callouts to emphasize an an area of the screen.
- Create a short video of the interaction and link to it.
Emojis
Don't use the Markdown emoji format, for example :smile:, for any purpose. Use
GitLab SVG icons instead.
Use of emoji in Markdown requires GitLab Flavored Markdown, which is not supported by Kramdown, the Markdown rendering engine used for GitLab documentation.
GitLab SVG icons
Introduced in GitLab 12.7.
You can use icons from the GitLab SVG library
directly in the documentation. For example, **{tanuki}** renders as: {tanuki}.
In most cases, you should avoid using the icons in text. However, you can use an icon when hover text is the only available way to describe a UI element. For example, Delete or Edit buttons often have hover text only.
When you do use an icon, start with the hover text and follow it with the SVG reference in parentheses.
- Avoid:
Select **{pencil}** **Edit**.This generates as: Select {pencil} Edit. - Use instead:
Select **Edit** (**{pencil}**).This generates as: Select Edit ({pencil}).
Do not use words to describe the icon:
- Avoid:
Select **Erase job log** (the trash icon). - Use instead:
Select **Erase job log** (**{remove}**).This generates as: Select Erase job log ({remove}).
When the button doesn't have any hover text, you can describe the icon. Follow up by creating a UX bug issue to add hover text to the button to improve accessibility.
- Avoid:
Select **{ellipsis_v}**. - Use instead:
Select the vertical ellipsis (**{ellipsis_v}**).This generates as: Select the vertical ellipsis ({ellipsis_v}).
Videos
Adding GitLab YouTube video tutorials to the documentation is highly encouraged, unless the video is outdated. Videos should not replace documentation, but complement or illustrate it. If content in a video is fundamental to a feature and its key use cases, but isn't adequately covered in the documentation, you should:
- Add this detail to the documentation text.
- Create an issue to review the video and update the page.
Do not upload videos to the product repositories. Link or embed them instead.
Link to video
To link out to a video, include a YouTube icon so that readers can scan the page for videos before reading:
<i class="fa fa-youtube-play youtube" aria-hidden="true"></i>
For an overview, see [Video Title](link-to-video).
You can link any up-to-date video that's useful to the GitLab user.
Embed videos
Introduced in GitLab 12.1.
The GitLab documentation site supports embedded videos.
You can embed videos from the official YouTube account for GitLab only. For videos from other sources, link them instead.
In most cases, link to a video, because embedded videos take up a lot of space on the page and can be distracting to readers.
To embed a video:
- Copy the code from this procedure and paste it into your Markdown file. Leave a blank line above and below it. Do not edit the code (don't remove or add any spaces).
- In YouTube, visit the video URL you want to display. Copy the regular URL
from your browser (
https://www.youtube.com/watch?v=VIDEO-ID) and replace the video title and link in the line under<div class="video-fallback">. - In YouTube, select Share, and then select Embed.
- Copy the
<iframe>source (src) URL only (https://www.youtube-nocookie.com/embed/VIDEO-ID), and paste it, replacing the content of thesrcfield in theiframetag.
leave a blank line here
<div class="video-fallback">
  See the video: <a href="https://www.youtube.com/watch?v=MqL6BMOySIQ">Video title</a>.
</div>
<figure class="video-container">
  <iframe src="https://www.youtube-nocookie.com/embed/MqL6BMOySIQ" frameborder="0" allowfullscreen> </iframe>
</figure>
leave a blank line here
This is how it renders on the GitLab documentation site:
Notes:
- The
figuretag is required for semantic SEO and thevideo-containerclass is necessary to make sure the video is responsive and displays on different mobile devices.- The
<div class="video-fallback">is a fallback necessary for/help, because the GitLab Markdown processor doesn't support iframes. It's hidden on the documentation site, but is displayed by/help.- The
www.youtube-nocookie.comdomain enables the Privacy Enhanced Mode of the YouTube embedded player. This mode allows users with resticted cookie preferences to view embedded videos.
Alert boxes
Use alert boxes to call attention to information. Use them sparingly, and never have an alert box immediately follow another alert box.
Alert boxes are generated when one of these words is followed by a line break:
FLAG:NOTE:WARNING:-
INFO:(Marketing only) DISCLAIMER:
For example:
NOTE:
This is something to note.
To display an alert box for multiple paragraphs, lists, or headers, use blockquotes instead.
Alert boxes render only on the GitLab documentation site (https://docs.gitlab.com). In the GitLab product help, alert boxes appear as plain text.
Flag
Use this alert type to describe a feature's availability. For information about how to format
FLAG alerts, see Document features deployed behind feature flags.
Note
Use notes sparingly. Too many notes can make topics difficult to scan.
Instead of adding a note:
- Re-write the sentence as part of a paragraph.
- Put the information into its own paragraph.
- Put the content under a new topic title.
If you must use a note, use this format:
NOTE:
This is something to note.
It renders on the GitLab documentation site as:
NOTE: This is something to note.
Warning
Use a warning to indicate deprecated features, or to provide a warning about procedures that have the potential for data loss.
WARNING:
This is something to be warned about.
It renders on the GitLab documentation site as:
WARNING: This is something to be warned about.
Info
The Marketing team uses the INFO alert to add information relating
to sales and marketing efforts.
The text in an INFO: alert always renders in a floating text box to the right of the text around it.
To view the rendered GitLab docs site, check the review app in the MR. You might need to move the text up or down
in the surrounding text, depending on where you'd like to floating box to appear.
For example, if your page has text like this:
This is an introductory paragraph. GitLab uses the SSH protocol to securely communicate with Git.
When you use SSH keys to authenticate to the GitLab remote server,
you don't need to supply your username and password each time.

INFO:
Here is some information. This information is an important addition to how you
work with GitLab and you might want to consider it.

And here is another paragraph. GitLab uses the SSH protocol to securely communicate with Git.
When you use SSH keys to authenticate to the GitLab remote server,
you don't need to supply your username and password each time.

And here is another paragraph. GitLab uses the SSH protocol to securely communicate with Git.
When you use SSH keys to authenticate to the GitLab remote server,
you don't need to supply your username and password each time.
It renders on the GitLab documentation site as:
This is an introductory paragraph. GitLab uses the SSH protocol to securely communicate with Git. When you use SSH keys to authenticate to the GitLab remote server, you don't need to supply your username and password each time.
INFO: Here is some information. This information is an important addition to how you work with GitLab and you might want to consider it.
And here is another paragraph. GitLab uses the SSH protocol to securely communicate with Git. When you use SSH keys to authenticate to the GitLab remote server, you don't need to supply your username and password each time.
And here is another paragraph. GitLab uses the SSH protocol to securely communicate with Git. When you use SSH keys to authenticate to the GitLab remote server, you don't need to supply your username and password each time.
Disclaimer
Use to describe future functionality only. For more information, see Legal disclaimer for future features.
Blockquotes
For highlighting a text inside a blockquote, use this format:
> This is a blockquote.It renders on the GitLab documentation site as:
This is a blockquote.
If the text spans multiple lines, you can split them.
For multiple paragraphs, use the symbol > before every line:
> This is the first paragraph.
>
> This is the second paragraph.
>
> - This is a list item
> - Second item in the list
It renders on the GitLab documentation site as:
This is the first paragraph.
This is the second paragraph.
- This is a list item
- Second item in the list
Tabs
On the docs site, you can format text so it's displayed as tabs.
To create a set of tabs, follow this example:
::Tabs

:::TabTitle Tab One

Here's some content in tab one.

:::TabTitle Tab Two

Here's some other content in tab two.

::EndTabs
This code renders on the GitLab documentation site as:
::Tabs
:::TabTitle Tab One
Here's some content in tab one.
:::TabTitle Tab Two
Here's some other content in tab two.
::EndTabs
For tab titles, be brief and consistent. Ensure they are parallel, and start each with a capital letter. For example:
-
Linux package (Omnibus),Helm chart (Kubernetes)(when documenting configuration edits, follow the configuration edits guide) -
15.1 and earlier,15.2 and later
Until we implement automated testing for broken links to tabs (Issue 1355), do not link directly to a single tab, even though they do have unique URL parameters.
See Pajamas for more details on tabs.
Terms
To maintain consistency through GitLab documentation, use these styles and terms.
Describe UI elements
Follow these styles when you're describing user interface elements in an application:
- For elements with a visible label, use that label in bold with matching case.
For example,
Select **Cancel**. - For elements with a tooltip or hover label, use that label in bold with
matching case. For example,
Select **Add status emoji**.
Products and features
Refer to the information in this section when describing products and features in the GitLab product documentation.
Avoid line breaks in names
If a feature or product name contains spaces, don't split the name with a line break. When names change, it is more complicated to search or grep text that has line breaks.
Product tier badges
Tier badges are displayed as orange text next to a topic title. These badges link to the GitLab pricing page.
You must assign a tier badge:
- To all H1 topic titles, except the pages under
doc/development/*. - To topic titles that don't apply to the same tier as the H1.
To add a tier badge to a topic title, add the relevant tier badge after the title text. For example:
# Topic title **(FREE)**Do not add tier badges inline with other text, except for API attributes. The single source of truth for a feature should be the topic where the functionality is described.
Available product tier badges
| Where feature is available | Tier badge |
|---|---|
| On GitLab self-managed and GitLab SaaS, available in all tiers. | **(FREE)** |
| On GitLab self-managed and GitLab SaaS, available in Premium and Ultimate. | **(PREMIUM)** |
| On GitLab self-managed and GitLab SaaS, available in Ultimate. | **(ULTIMATE)** |
| On GitLab self-managed, available in all tiers. Not available on GitLab SaaS. | **(FREE SELF)** |
| On GitLab self-managed, available in Premium and Ultimate. Not available on GitLab SaaS. | **(PREMIUM SELF)** |
| On GitLab self-managed, available in Ultimate. Not available on GitLab SaaS. | **(ULTIMATE SELF)** |
| On GitLab SaaS, available in all tiers. Not available on self-managed. | **(FREE SAAS)** |
| On GitLab SaaS, available in Premium and Ultimate. Not available on self-managed. | **(PREMIUM SAAS)** |
| On GitLab SaaS, available in Ultimate. Not available on self-managed. | **(ULTIMATE SAAS)** |
Topics that are only for instance administrators should be badged <TIER> SELF. Instance
administrator documentation often includes sections that mention:
- Changing the
gitlab.rborgitlab.ymlfiles. - Accessing the rails console or running Rake tasks.
- Doing things in the Admin Area.
These pages should also mention if the tasks can only be accomplished by an instance administrator.
Specific sections
Certain styles should be applied to specific sections. Styles for specific sections are outlined in this section.
GitLab restart
When a restart or reconfigure of GitLab is required, avoid duplication by linking
to doc/administration/restart_gitlab.md
with text like this, replacing 'reconfigure' with 'restart' as needed:
Save the file and [reconfigure GitLab](../../../administration/restart_gitlab.md)
for the changes to take effect.
If the document resides outside of the doc/ directory, use the full path
instead of the relative link:
https://docs.gitlab.com/ee/administration/restart_gitlab.html.
How to document different installation methods
GitLab supports five official installation methods. If you're referring to words as part of sentences and titles, use the following phrases:
- Linux package
- Helm chart
- GitLab Operator
- Docker
- Self-compiled
It's OK to add the explanatory parentheses when using tabs:
- Linux package (Omnibus)
- Helm chart (Kubernetes)
- GitLab Operator (Kubernetes)
- Docker
- Self-compiled (source)
Use tabs to describe a self-managed configuration procedure
Configuration procedures can require users to edit configuration files, reconfigure GitLab, or restart GitLab. In this case:
- Use tabs to differentiate among the various installation methods.
- Use the installation methods names exactly as described in the previous list.
- Use them in the order described below.
- Indent the code blocks to line up with the list item they belong to.
- Use the appropriate syntax highlighting for each code block (
ruby,shell, oryaml). - For the YAML files, always include the parent settings.
- The final step to reconfigure or restart GitLab can be used verbatim since it's the same every time.
When describing a configuration edit, you can use and edit to your liking the following snippet:
::Tabs

:::TabTitle Linux package (Omnibus)

1. Edit `/etc/gitlab/gitlab.rb`:

   ```ruby
   external_url "https://gitlab.example.com"
   ```

1. Save the file and reconfigure GitLab:

   ```shell
   sudo gitlab-ctl reconfigure
   ```

:::TabTitle Helm chart (Kubernetes)

1. Export the Helm values:

   ```shell
   helm get values gitlab > gitlab_values.yaml
   ```

1. Edit `gitlab_values.yaml`:

   ```yaml
   global:
     hosts:
       gitlab:
         name: gitlab.example.com
   ```

1. Save the file and apply the new values:

   ```shell
   helm upgrade -f gitlab_values.yaml gitlab gitlab/gitlab
   ```

:::TabTitle Docker

1. Edit `docker-compose.yml`:

   ```yaml
   version: "3.6"
   services:
     gitlab:
       environment:
         GITLAB_OMNIBUS_CONFIG: |
           external_url "https://gitlab.example.com"
   ```

1. Save the file and restart GitLab:

   ```shell
   docker compose up -d
   ```

:::TabTitle Self-compiled (source)

1. Edit `/home/git/gitlab/config/gitlab.yml`:

   ```yaml
   production: &base
     gitlab:
       host: "gitlab.example.com"
   ```

1. Save the file and restart GitLab:

   ```shell
   # For systems running systemd
   sudo systemctl restart gitlab.target

   # For systems running SysV init
   sudo service gitlab restart
   ```

::EndTabs
It renders as:
::Tabs
:::TabTitle Linux package (Omnibus)
-
Edit
/etc/gitlab/gitlab.rb:external_url "https://gitlab.example.com" -
Save the file and reconfigure GitLab:
sudo gitlab-ctl reconfigure
:::TabTitle Helm chart (Kubernetes)
-
Export the Helm values:
helm get values gitlab > gitlab_values.yaml -
Edit
gitlab_values.yaml:global: hosts: gitlab: name: gitlab.example.com -
Save the file and apply the new values:
helm upgrade -f gitlab_values.yaml gitlab gitlab/gitlab
:::TabTitle Docker
-
Edit
docker-compose.yml:version: "3.6" services: gitlab: environment: GITLAB_OMNIBUS_CONFIG: | external_url "https://gitlab.example.com" -
Save the file and restart GitLab:
docker compose up -d
:::TabTitle Self-compiled (source)
-
Edit
/home/git/gitlab/config/gitlab.yml:production: &base gitlab: host: "gitlab.example.com" -
Save the file and restart GitLab:
# For systems running systemd
sudo systemctl restart gitlab.target

# For systems running SysV init
sudo service gitlab restart
::EndTabs
Feature flags
Learn how to document features deployed behind flags. For guidance on developing GitLab with feature flags, see Feature flags in development of GitLab.